


68.
3/8”
3/4”
DIA.
9/32”
HOLE
1/4” x 20 x 1-1/2” LONG
STANDARD HEX. HEAD
1/4” x 20
HEX. NUT
WASHER
1 2
3
FENCE
3
4
5
6
7
BLADE
FIG. 57
FIG. 58
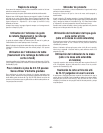
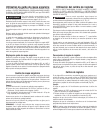
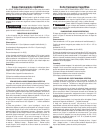
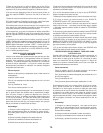
Repetitive Crosscutting
REPETITIVE CROSSCUTTING is known as cutting a quantity of
pieces the same length without having to mark each piece.
W
hen making repetitive cuts from a long workpiece, make sure it
is supported – see Fig. 58.
N
ever use the rip fence as a direct length stop
because the cutoff piece could bind between the
fence and the blade causing kickback.
When attaching the facing block, make sure the
block is well in front of the sawblade, because
t
he cutoff piece could bind between the fence and the blade
causing kickback.
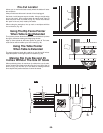
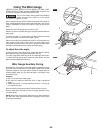
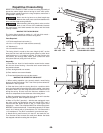
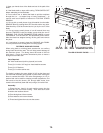
MAKING THE FACING BLOCK
T
he facing block should be made of 1-1/2 inch thick wood –
Figure 57 shows dimensions to make a facing block.
Parts Required:
1-1/2” thick wood board cut to size (1)
1/4 x 20 x 1-1/2” long hex. head machine screws (2)
1/4” Washers (2)
1/4 x 20 machine nuts (2)
The facing block is made to the same height (2-3/4”) as the
fence and can work with the blade guard system in place when
cutoff pieces are 1-1/2 inches or greater. Cut the board to the
size shown, drill through 9/32” holes, then counter-sink each
hole (down 3/8 inch) using a 3/4 inch drill bit.
Assembly:
1) Place the hex. head 1 of each machine screw into the recess
2 in the rear fence housing – then slide each screw forward to
the locations shown.
2) Place facing block
3 over screws.
3) Place washers over screw threads.
4) Thread and tighten the nuts onto the screws.
MAKING THE REPETITIVE CROSSCUT
1. When making repetitive cuts, securely attach a wood facing
block to the fence as shown. The T-slot in the rip fence allows for
attachment - see Figure 58.
2. Slide the fence (with the facing block) to a position which
gives you the length of board that you want to repeat. Lock fence
in position. Note: If you are using the scale on the saws front rail
during the set-up, be sure move the fence an additional 1-1/2
inches to compensate for the thickness of the facing block.
3. Slide the workpiece
4 along the miter gauge 5 until it touches
the facing block
3. Hold workpiece securely.
4. Make a “Dry Run” (practice) – with the saw unplugged, move
the miter gauge and workpiece along the facing block until it
touches the idle blade (blade is set 1/4 inch higher than
workpiece) – Note: The workpiece MUST be off the facing block
BEFORE it contacts the blade. Crosscutting capacity
7 for these
cuts is 6-1/4 inches with a 3/4 workpiece or 5-1/2 inches with a
1-1/2 workpiece. If “Dry Run” is successful, go to the next step.
5. Attach saw to power source, turn saw on, and make the cut.
Turn the saw off and remove the cutoff piece
6 after the blade
has stopped and before cutting the next piece.
WARNING
!
WARNING
!