


SKU 91511 PAGE 10
25. WARNING! People with pacemakers should consult their physician(s)
before using this product. Electromagnetic fields in close proximity to a heart
pacemaker could cause interference to or failure of the pacemaker.
26. WARNING! Some dust created by power sanding, sawing, grinding,
drilling, and other construction activities, contain chemicals known (to the State
of California) to cause cancer, birth defects or other reproductive harm. Some
examples of these chemicals are: lead from lead-based paints, crystalline silica
from bricks and cement or other masonry products, arsenic and chromium from
chemically treated lumber. Your risk from these exposures varies, depending on
how often you do this type of work. To reduce your exposure to these chemicals:
work in a well ventilated area, and work with approved safety equipment, such as
those dust masks that are specially designed to filter out microscopic particles.
(California Health & Safety Code 25249.5, et seq.)
27. The warnings, precautions, and instructions discussed in this manual
cannot cover all possible conditions and situations that may occur. It must
be understood by the operator that common sense and caution are factors which
cannot be built into this product, but must be supplied by the operator.
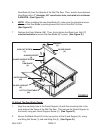
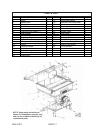
ASSEMBLY INSTRUCTIONS
NOTE: For additional references to the parts listed in the following pages, refer to the
Assembly Diagram on page 17.
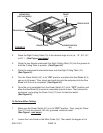
To Remove And Install The Saw Blade:
1. WARNING! Prior to performing any assembly procedures, make sure
the Power Cord (17) of the Wet Tile Saw is unplugged from its electrical
outlet. Also, make sure the unit has completely cooled and wear heavy
duty work gloves.
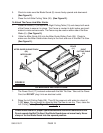
2. Open the Left Side Cutting Table (26) to expose the old Saw Blade (6).
(See Figure D, next page.)
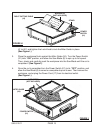
3. Using the accessory Wrench (33), remove the Blade Lock Nut (27) by unscrewing
it in a clockwise direction. (See Figure D.)
4. Once the Blade Lock Nut (27) is removed, remove the Outer Washer (28).
(See Figure D.)
5. While wearing heavy duty work gloves to avoid accidental cuts, remove the old