


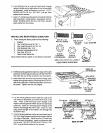
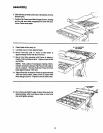
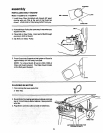

assembly
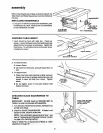
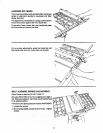
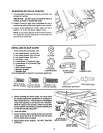
If the Fence does not slide easily along the Bars, the
pressure of the spring can be REDUCED.
1. Loosen the screws.
2. Move spring slightly toward rear of Fence. Tighten
screws.
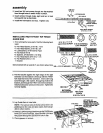
WARNING: Toavoid Injury from jarnsorklckbacks,
be sure to push properly adjusted Lock Lever all the
way down until the lever rests on the stop before
using the Rip Fence.
SPRING
SLIDE SPRING TO
ADJUST PRESSURE
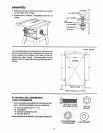
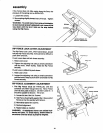
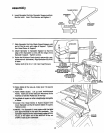
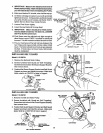
RiP FENCE LOCK LEVER ADJUSTMENT
The Rip Fence Lock Lever, when locked down, should
holdthe Rip Fence securely, it should not be difficultto
push down and lock.
If Lock Lever does not lock fence securely:
1. Raise Lock Lever.
2. Tighten the adjusting nut using a small screwdriver
until the lever, when locked, holds the Rip Fence
securely.
If Lock Lever is difficultto push down:
1. Raise Lock Lever.
2. Loosen the adjusting nut using a small screwdriver
untilthe lever is easy to push down and holdsthe Rip
Fence securely.
ADJUSTING NUT
FENCE HEAD
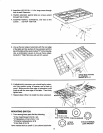
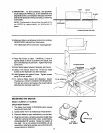
RiP FENCE ALIGNMENT ADJUSTMENT
1. The Rip Fence must be PARALLEL with the
sawblade and Miter Gauge Grooves. Move Fence
until itis along side of Groove. DO NOT LOCK IT. It
should be parallel to Groove. ff itis not;
A. Loosen the two Hex Hd. Screws.
B. Hold Fence head tightlyagainst Bar. Move end of
Fence so that it is parallel with Groove.
C. Alternately tighten the screws.
D. Recheck alignment.
E. Repeat steps as needed.
WARNING: A misallgned fence can cause kick-
backs and jams. To avoid Injury, follow these irv
structlons until the fence is properly aligned.
HEXSCREWS
FENCE HEAD
18