


21
A
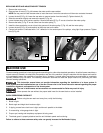
Fig. 55
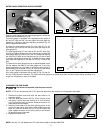
Fig. 48
Fig. 48
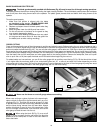
Fig. 56
Fig. 57
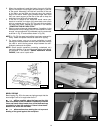
Fig. 58
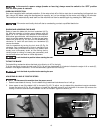
2. When the workpiece is past the blade, the work will either
stay on the table or tilt up slightly and be caught by the end
of the guard. Alternately, the feed will continue to the end
of the table, and be lifted and brought along the outside
edge of the fence. When ripping boards longer than three
feet, use a work support at the rear of the saw to keep the
workpiece from falling off the saw table.
3. If the size or shape of the workpiece would cause your
hands to be within six inches of the saw blade, use a push
stick to complete the cut (Fig. 52) The push stick can easily
be made from scrap material as explained in the section
“CONSTRUCTING A PUSH STICK.”
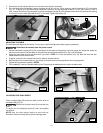
4. Ripping narrow pieces can be dangerous. If possible, rip the
narrow piece from the larger piece. If the workpiece is short
enough, use a pushboard. (A pushboard can be constructed
as shown in Fig. 57 and used as shown in Fig. 58.)
NOTE: In Fig. 58 the guard and splitter have been removed for
clarity. Guard and splitter should be used when ripping.
5. For longer pieces, use one or more pushsticks to avoid
placing your hands between the fence and the blade. Always
use care to avoid binding narrow strips between the anti-
kickback pawls and the splitter.
NOTE: Some special operations (moulding cutterhead, etc.)
require the addition of an auxiliary wood facing to the fence,
as explained in the section “USING AUXILIARY WOOD
FACING,” and use of a push stick.
BEVEL RIPPING
Bevel ripping (Fig. 59) is the same as ripping except that the
bevel angle is set to an angle other than 0
°.
When possible, place the fence on the right
side of the blade so that the blade is tilted away from the
fence and hands. Keep hands clear of the blade and use
a pushstick to feed the workpiece if there is less than 6”
between the fence and the blade.
Use caution when starting the cut to prevent
binding of the guard against the workpiece.
Fig. 59