


DSL-G624T Wireless A DSL Router User’s Guide
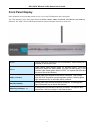
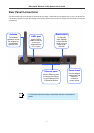
Power on Router
CAUTION: The Router must be used with the power adapter included with the device.
To power on the Router:
1. Insert the AC Power Adapter cord into the power receptacle located on the rear panel of the Router and plug the
adapter into a suitable nearby power source.
2. You should see the Power LED indicator light up and remain lit. The Status LED should light solid green and begin
to blink after a few seconds.
3. If the Ethernet port is connected to a working device, check the Ethernet Link/Act LED indicators to make sure the
connection is valid. The Router will attempt to establish the ADSL connection, if the ADSL line is connected and
the Router is properly configured this should light up after several seconds. If this is the first time installing the
device, some settings may need to be changed before the Router can establish a connection.
Factory Reset Button
The Router may be reset to the original factory default settings by depressing the reset button for a few seconds while
the device is powered on. Use a ballpoint or paperclip to gently push down the reset button. Remember that this will
wipe out any settings stored in flash memory including user account information and LAN IP settings. The device
settings will be restored to the factory default IP address 192.168.1.1 and the subnet mask is 255.255.255.0, the default
management Username is admin and the default Password is admin.
Wired Network Connections
Wired network connections are provided through the ADSL port and the four Ethernet ports on the back of the Router.
See the Rear Panel diagram above and the illustrations below for examples.
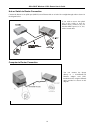
Connect ADSL Line
Use the ADSL cable included with the Router to connect it to a telephone wall socket or receptacle. Plug one end of the
cable into the ADSL port (RJ-11 receptacle) on the rear panel of the Router and insert the other end into the RJ-11 wall
socket. If you are using a low pass filter device, follow the instructions included with the device or given to you by your
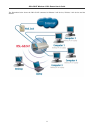
service provider. The ADSL connection represents the WAN interface, the connection to the Internet. It is the physical
link to the service provider’s network backbone and ultimately to the Internet.
Connect Router to Ethernet
The Router may be connected to a single computer or Ethernet device through the 10/100 BASE-TX Ethernet port on
the rear panel. Any connection to an Ethernet concentrating device such as a switch or hub must operate at a speed of
10/100 Mbps only. When connecting the Router to any Ethernet device that is capable of operating at speeds between
0~100Mbps, be sure that the device has auto-negotiation (NWay) enabled for the connecting port.
Use standard twisted-pair cable with RJ-45 connectors. The RJ-45 port on the Router is a crossed port (MDI-X). Follow
standard Ethernet guidelines when deciding what type of cable to use to make this connection. When connecting the
Router directly to a PC or server use a normal straight-through cable. You should use a crossed cable when connecting
the Router to a normal (MDI-X) port on a switch or hub. Use a normal straight-through cable when connecting it to an
uplink (MDI-II) port on a hub or switch.
The rules governing Ethernet cable lengths apply to the LAN to Router connection. Be sure that the cable connecting
the LAN to the Router does not exceed 100 meters.
9