


12 308–293
Setup
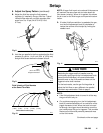
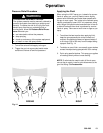
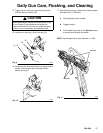
6. Adjust the Spray Pattern
(continued)
E. Open
the pattern adjustment valve (13a) by turning
it fully counterclockwise for a full fan pattern.
02017
Fig. 12
13a
Open
(wider
pattern)
Close
(narrower
pattern*)
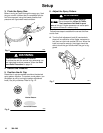
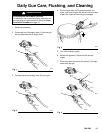
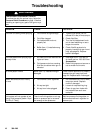
F.
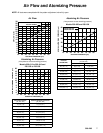
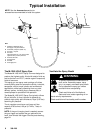
Using the air pressure regulator (F), set the gun air
supply pressure at 50 psi (345 kPa, 3.4 bar) at the
gun inlet.
If available, use the fluid manufacturer
’
s recom
-
mendations to set the air line pressure for a high
volume, low pressure, spray gun application.
NOTE:
Local laws may limit the maximum pres
-
sure to 10 psi (70 kPa, 0.7 bar) at the air cap for
HVLP compliance.
Fig. 13
F
01997
G. T
est the spray pattern and atomization while hold
-
ing the gun about 6 to 8 inches (150 to 200 mm)
from the test piece.
H.
The spray pattern may be too wide with the pattern
adjustment knob (13a) turned fully counterclock
-
wise. T
urn the pattern adjustment knob clockwise
until you have the desired pattern size.
NOTE:
Turning
the pattern adjustment knob fully
clockwise will produce a round pattern.
I.
Check the atomization quality again. Increase the
gun air supply pressure with the air pressure regu
-
lator in 5 psi (34 kPa, 0.3 bar) increments until you
obtain the desired atomization.
J.
If after increasing the gun air supply pressure the
atomization is still unacceptable, try installing a
larger fluid nozzle size to reduce the fluid velocity
.
Refer to Fig. 10. Repeat steps 6-E to 6-I until you
obtain the desired atomization.
CAUTION
T
rigger the gun whenever you tighten or remove the
nozzle. This keeps the needle seat away from the
nozzle seating surface and prevents the seat from
being scratched.
When tightening the nozzle, do not exceed 35 in-lbs
(4 N
Sm)
torque. Over-tightening the nozzle can cause
the nozzle hex to round, can affect the spray pattern,
and
is unnecessary to guarantee a seal.