


-20-
G8030 3 H.P. Overarm Router
SECTION 6: OPERATIONS
Test Run
Guide Pin
Installation
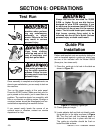
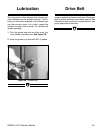
Pattern and template cuts are made by sliding the
work or template against a guide pin, which may
be one of six included with the Model G8030
(three pins, two sizes each).
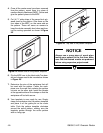
1. Place the guide pin in its hole in the table as
shown in Figure 21.
Figure 21. Installing a guide pin.
2. Check guide pin height.
3. Locate adjuster bolt and lock nut directly under
the guide pin in the table as shown in Figure
22. Turn the bolt until the desired depth is
obtained and then lock in place with the nut.
The guide pin shoulder should be flush or
below the table surface.
Once assembly is complete and adjustments are
done to your satisfaction, you are ready to test run
the machine.
Turn on the power supply at the main panel.
Press the START button. Make sure that your fin-
ger is poised on the switch, just in case there is a
problem. The machine should run smoothly, with
little or no vibration or rubbing noises. Strange or
unnatural noises should be investigated and cor-
rected before operating the machine further.
If you cannot easily locate the source of an
unusual noise or vibration, contact our service
department for help.
Always use bits that are rated for 20,000
R.P.M. or higher. Do not use bits that are
designed for slow R.P.M. operation. If you
do not know the maximum rated R.P.M. for
a particular bit, do not use it in the overarm
router. The bit could break apart under the
high forces, causing flying metal to be
launched into the air like a bullet. Serious
personal injury or death could result.
Disconnect power to the
machine when perform-
ing any maintenance,
assembly or adjust-
ments. Failure to do this
may result in serious
personal injury.
!
Keep loose clothing
rolled up and out of the
way of machinery and
keep hair pulled back.
Wear safety glasses dur-
ing the entire operation
process. Failure to com-
ply may result in serious
personal injury.