


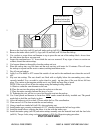
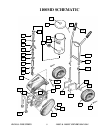

H.E.R.O. INDUSTRIES 1100C & 1100NC OWNERS MANUAL
25
TOOLS
REQUIRED
-1" wrench
-11/16" wrench
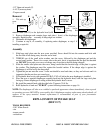
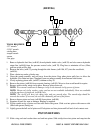
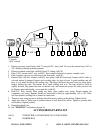
1. Remove pressure control knob, (ref# 71) and pull P.C. stem, (ref# 74) out to the internal stop (1/16" to
1/8") thereby releasing hydraulic pressure.
2. Remove hydraulic return line, (ref# 69) from P.C. fitting, (ref# 78).
3. Place 11/16" wrench on P.C. seat, (ref# 83). Turn counter-clockwise to remove complete valve.
4. Place complete valve in vise and remove seat from body, (ref# 79).
5. Remove ball, (ref# 84), retainer, (ref# 82), and spring, (ref# 80) from body. Inspect ball for nicks or
cuts and replace if damaged. Inspect seat at sealing edge, for signs of wear. A good condition seat will
have a very small beveled at the sealing edge. The larger the bevel the more wear has taken place.
Inspect retainer for wear. The retainer has a small locating hole in it. The hole should be flush or
slightly beveled. The greater the wear on the ball, seat, and retainer the poorer the static pressure will
be. Replace parts individually, or use repair kit, (ref# 85).
6. Hold P.C. body vertical. Place spring into body, place retainer onto spring. Ensure retainer fits
completely over spring. Retainer should rest below end of body by approximately 1/4" to 3/8". Place
ball onto retainer, ensuring ball is located on center hole.
7. Thread on seat, using care not to dislodge the ball from its position on the retainer. Tighten firmly.
8. Apply pipe dope or Teflon tape to exterior threads of seat. Install into elbow. Tighten to prevent leaks
and return to original position.
9. Reattach hydraulic line.
10. See "PURGING" instructions on page 16.
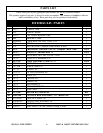
ACCESSORIES PARTS LIST
1/4x1/4 CONNECTOR, 1/4 PAINT HOSE TO 1/4 PAINT HOSE
106 RUBBER BAN
77
7
777 8888 8
8
7
7