


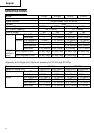

English
14
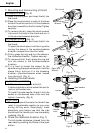
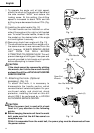
⅜ To operate the angle unit at high speed,
attach the chuck to the angle unit spindle at
the side marked “HIGH” and secure the
locking screw. At this setting, the drilling
speed is increased to about 150% and the
drilling torque decreased to about 70%. (Fig.
11)
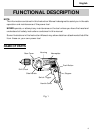
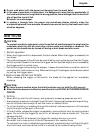
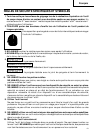
(3) Installing the side handle (Fig. 12)
The side handle can be installed on either
side of the angle unit for right or left handed
use. To install the side handle, thread it into
the socket on the desired side of the angle
unit and tighten it securely.
(4) Removing chuck from angle unit (Fig. 13)
⅜ The chuck can be removed from angle unit in
the same manner it was removed from the
drill; however, ALWAYS REMOVE ANGLE
UNIT FROM THE DRILL BEFORE
ATTEMPTING TO LOOSEN CHUCK. This will
prevent damage of drills gear. Use open end
wrench provided to hold angle unit spindle
before attempting to loosen chuck.
CAUTION:
If the chuck cannot be removed by striking
the wrench, don’t strike the wrench forcibly
and send the drill to a HITACHI AUTHORIZED
SERVICE CENTER.
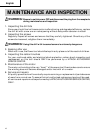
11. Attaching the hook. (Optional
accessory) (Fig. 14)
To attach the hook, it is necessary to
disassemble the handle portion which
covered the tool’s electrical system. For your
continued safety and electrical shock
protection, installing the hook on this drill
should ONLY be performed by a HITACHI
AUTHORIZED SERVICE CENTER.
CAUTION:
When the power tool is used with a hook
fixed to it, pay attention to the following
points:
ⅷ Before hanging the main unit from the waist
belt, make sure that the drill has come to a
complete stop.
While it is suspended from the waist belt, the power plug must be disconnected from
the power source.
Fig. 12
Fig. 13
Fig. 14
Side Handle
Open End
Wrench
Hex. Bar Wrench
Hook (A)
Fig. 11
High Speed