


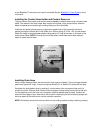

3
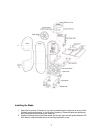
3. Use one hand to grasp the bottom of the upper wheel between two spokes and pull the
bottom of the wheel towards you (approximately 3/8", but you should feel it move easily
initially and then "hit" and not want to go further without forcing), then, while the wheel is
tilted towards you, pull the wheel down enough to place the blade around the wheel using
your other hand.
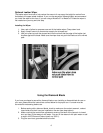
4. Slowly release the wheel as you make sure the blade remains on both wheels and
passes through the right and left channels.
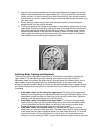
5. Tracking, the position of the blade on the wheels, is controlled by adjusting the tilt of the
upper wheel. Check the tracking by rotating the lower drive wheel several revolutions by
hand while watching the position of the blade on the wheels. The blade should remain
centered on both wheels. If the blade isn’t centered or comes off either wheel, you will
need to adjust the tracking and alignment as outlined in the next sections. If the blade
rides centered on the wheels skip to installing the table.
Adjusting Blade Tracking and Alignment
The wheels are factory aligned so that the position of the blade is controlled by adjusting the
upper wheel tilt. On the back of the upper housing is the tension device with a nylon tilt
adjustment screw in the middle. Be aware that any changes made to the blade position on the
upper wheel will have the opposite effect on the blade’s position on the lower wheel. Read
through the possible problems below to find the one that best describes what is happening when
you hand turned the wheel and follow the instructions for fixing it. Make all adjustments in small
increments.
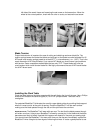
1. If the blade “walks” off the front of the upper wheel: Tilt the top of the upper wheel
backward by turning the nylon tilt adjustment screw to the right (clockwise). Make 1/2 turn
adjustments and test the effect on tracking by hand turning the lower wheel. Repeat as
necessary until the blade remains in the correct position.
2. If the blade “walks” to the back of the upper wheel: Tilt the top of the upper wheel
forward by turning the nylon tilt adjustment screw to the left (counter-clockwise). Make
1/2 turn adjustments and test the effect on tracking by hand turning the lower wheel.
Repeat as necessary until the blade remains in the correct position.
3. If the blade "walks" off the lower wheel: This indicates that the upper and lower
wheels are not in alignment with each other. The lower (fixed) wheel is closer to the back
of the frame than the upper (adjustable) wheel. The lower wheel should be 1/2” from the
inside of the frame. You can check this with a ruler or scale. The lower wheel can be
moved in or out by inserting the 5/64” long arm Allen wrench through the hole in the lower