


6
For chipping, scaling or demolition operations, depress
the lock button and rotate the change lever so that the
pointer points to the symbol. Use a bull point, cold
chisel, scaling chisel, etc.
CAUTION:
• When using the tool in the symbol mode, the
switch trigger does not work and only the slide
switch works.
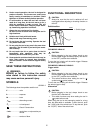
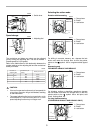
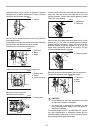
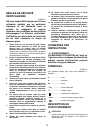
FOR MODEL HR4011C
For chipping, scaling or demolition operations, depress
the lock button and rotate the change lever so that the
pointer points to the symbol. Use a bull point, cold
chisel, scaling chisel, etc.
CAUTION:
• Do not rotate the change lever when the tool is
running under load. The tool will be damaged.
• To avoid rapid wear on the mode change
mechanism, be sure that the change lever is always
positively located in one of the two or three action
mode positions.
Torque limiter
The torque limiter will actuate when a certain torque level
is reached. The motor will disengage from the output
shaft. When this happens, the bit will stop turning.
CAUTION:
• As soon as the torque limiter actuates, switch off
the tool immediately. This will help prevent
premature wear of the tool.
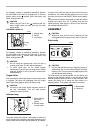
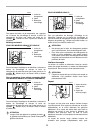
Indicator lamp
The green power-ON indicator lamp lights up when the
tool is plugged. If the indicator lamp does not light up, the
mains cord or the controller may be defective. The indica-
tor lamp is lit but the tool does not start even if the tool is
switched on, the carbon brushes may be worn out, or the
controller, the motor or the ON/OFF switch may be defec-
tive.
The red service indicator lamp lights up when the carbon
brushes are nearly worn out to indicate that the tool
needs servicing. After approx. 8 hours of use, the motor
will automatically be shut off.
ASSEMBLY
CAUTION:
• Always be sure that the tool is switched off and
unplugged before carrying out any work on the tool.
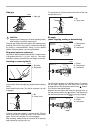
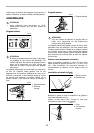
Side handle
CAUTION:
• Use the side handle only when chipping, scaling or
demolishing. Do not use it when drilling in concrete,
masonry, etc. The tool cannot be held properly with
this side handle when drilling.
The side handle can be swung 360° on the vertical and
secured at any desired position. It also secures at eight
different positions back and forth on the horizontal. Just
loosen the clamp nut to swing the side handle to a
desired position. Then tighten the clamp nut securely.
1. Change lever
2. Pointer
3. Lock button
1. Power-ON indi-
cator lamp
(green)
2. Service indica-
tor lamp (red)
1
2
3
HR4011C
006312
1
2
006314
1. Side handle
2. Clamp nut
003139
1
2
006315