


DISCLAIMER: Under no circumstances shall the manufacturer or the distributors of the C2A-CHY2 be held liable for consequential damages sustained
in connection with the C2A-CHY23. The manufacture and it’s distributors will not, nor will they authorize any representative or any other individual to
assume obligation or liability in relation to the C2A-CHY23 other than its replacement.
03-14-11
Pacic Accessory Corporation - Santa Ana, CA 92705
866-931-8021• www.pac-audio.com
J1850
Class 2
VPW
Class 2
J1850
100011101111001001101100
111010000110110111001100
Arbitration
EOD
CRC
100011101111001001101100
111010000110110111001100
Class 2
Class 2
J1850
C2A-CHY/C2A-CHY23
Add-an-Amp Interface
for Chrysler Dodge and Jeep Radios
With a Factory Installed Amplier
The C2A-CHY provides a 4-channel pre-amp output signal for use with aftermarket ampliers. This
interface uses the full range xed level headunit output in conjunction with CAN messages to deliver a
5v RMS (max) pre-amp output with fading and balance capabilities. A radio controlled remote turn on
wire is also provided by the C2A-CHY.
Installation:
This interface is for use in Chrysler / Dodge / Jeep vehicles with a factory installed amplier. In order for the C2A-CHY to function
correctly, the factory audio system MUST be equipped with an OEM (typically branded Innity, Boston Acoustics, Alpine or Kicker)
external power amplier for the original speakers. If the vehicle does NOT have an OEM power amplier for the speakers, use the
AOEM-CHR3 interface instead.
1. Remove the factory radio and connect the c2a harness between the original radio connector and the radio. If more that one
“T-harness” is installed make sure the c2a is connected to the radio and other “T-harnesses” are connected after the c2a.
2. The 18-pin black Molex attached to the c2a has 2 four (4) pin connectors attached to it. These must plug into each other.
These connectors only t in one way and when connected correctly you will have the following wire color combinations:
Wht/Blk → Grn/Blk, Gry/Blk → Pur/Blk, White → Green, Grey → Purple
3. The 11-pin white output cable has the RCA connections and remote turn on wire. The remote turn wire is powered only when
the radio is on. YOU MUST USE THIS REMOTE TURN ON OUTPUT WITH THE NEW AMPLIFIER. FAILURE TO DO SO
MAY RESULT IN VERY HIGH VOLUME SPIKES WHEN THE RADIO IS FIRST TURNED ON. This is not a R.A.P (Retained
Accessory Power) wire. Connect the amplifiers RCA cables to the appropriate output (front - rear). Both front and rear outputs
do not need to be used in case of a 2 channel amplifier installation.
4. Connect the 18-pin Molex and 11-pin output connector to the C2A-CHY23 interface. The Black wire coming out of the 18-pin
connector will not be used in all installations. Test your amplifier for continuity from the RCA shield to the amplifier ground
connection terminal. If continuity exists, do not connect this black wire, isolate and do not use. If there is no continuity or if
there is high resistance between these two points, connect the black wire to the radio’s ground wire.
5. There are no adjustments on this interface, the radio’s fader and balance will control the C2A-CHY. Re-install the OEM radio. If
noise is present after installation it is recommended to use an SNI-1 noise filter.
AM/FM
LIST
TUNE/SCROLL
SCAN SPEAK U.c. TIMESEEK RW
1 2 3 4 5 6
AUX
SET
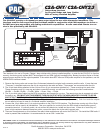
New Amplifier
Batt
Gnd
FL in
FR in
RL in
RR in
FL+
FR+
RL+
RR+
FL-
FR-
RL-
RR-
Rem
Not
Used
Factory Amplifier
+-
Connected
to new
speakers
Audio
Signal
Ground
Reference
Add an Amp Interface for Chrysler MSCANbus Radios with a Factory Amplifier
4 Channel RCA Output with a Radio Controlled 12v Remote Turn-on
www.pac-audio.com
Pacific Accessory Corporation · Santa Ana, Ca 92705
SAT
DISC
AUX
TYPE
SETUP
RND
Eject
SEEK INFO FF
C2A-CHY
Remote Turn On Wire