


—
8
—
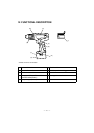
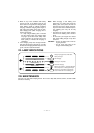
Clutch Torque Setting
Adjust the torque to one of the 18 possible set-
tings or “ ” position to the job.
CAUTION:
Test the setting before actual opera-
tion. Set the scale at this mark ( ).
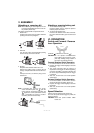
Note:
When the brake operates, a braking sound
may be heard. This sound indicates
engagement of the bit lock.
CAUTION:
To eliminate excessive temperature
increase of the tool surface, do not
operate the tool continuously using
two or more battery packs.
Tool needs cool off time before
switching to another pack.
• Do not close up vent holes on
body sides of the body during
operation. Otherwise, the machine
function is adversely affected to
cause a failure.
• Do not strain the tool (motor).
This may cause damage to the
unit.
• Use the machine in such a way as
to prevent the air from the body
vent holes from blowing directly
onto your skin. Otherwise, you
may get burnt.
• When operating with a Ni-MH bat-
tery pack, make sure the place is
well-ventilated.
For Appropriate use of Battery pack
Ni-MH Battery pack
(EY9200/EY9201/EY9230/EY9231)
• Charge the Ni-MH battery fully before storage
in order to ensure a longer service life.
• The ambient temperature range is between
0°C and 40°C.
If the battery pack is used when the battery
temperature is below 0°C, the tool may fail to
function properly. In that case, charge the bat-
tery until charging is completed for appropriate
functioning of the battery.
Ni-Cd Battery pack
(EY9106/EY9136)
• Nickel cadmium battery pack requires a
“BREAK-IN PERIOD” to reach maximum oper-
ating capacity. The “BREAK-IN PERIOD” is
accomplished during normal usage during the
first 6-8 charge and discharge cycles of the
battery pack.
After the “BREAK-IN PERIOD” is completed,
the battery pack will maintain maximum operat-
ing capacity throughout the normal life of the
battery pack.
Battery Pack Life
The rechargeable batteries have a limited life. If
the operation time becomes extremely short after
recharging, replace the battery pack with a new
one.
Charging
Note: When you charge the battery pack for the
first time, or after prolonged storage,
charge it for about 24 hours to bring the
battery up to full capacity.
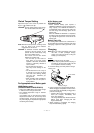
EY0230
1. Plug the charger into the AC outlet.
Note: Sparks may be produced when the plug is
inserted into the AC power supply, but this
is not a problem in terms of safety.
2. Insert the battery pack firmly into the charger.
3. During charging, the charging lamp will be lit.
When charging is completed, an internal elec-
tronic switch will automatically be triggered to
prevent overcharging.
• Charging will not start if the battery pack is
warm (for example, immediately after
heavy-duty operation).
The orange standby lamp will be lit until the
battery cools down. Charging will then
begin automatically.
4. When charging is completed, the charging
lamp will start flashing rapidly.
1
2
Battery pack
Battery charger
To AC outlet