


– 19 –
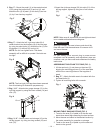
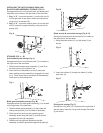
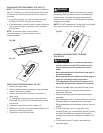
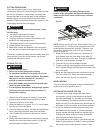
INSTALLING THE TABLE INSERT (FIG. BB, CC)
NOTE: The table insert has been previously installed on
your unit. However, you must verify that the table insert
is flush with the table top surface on all four corners of
the insert.
1. Insert the spring clip (1) under the table, and push
the table insert (2) to be flush with the table.
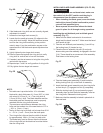
2. If the table insert is not flush with the table, adjust the
four screws (3) with a screwdriver until it is parallel
with the table.
NOTE: To raise the insert, turn the screws
counterclockwise, to lower the insert, turn the
screws clockwise.
Fig. BB
Fig. CC
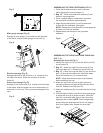
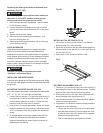
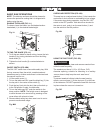
INSTALLING THE RIVING KNIFE (FIG. DD)
1. Remove the table insert.
2. With the blade elevation handwheel, raise the blade
arbor to the maximum height.
3. Loosen the riving knife lock knob (1) (minimum of
three turns).
4. To disengage riving knife lock pin, push lock knob
toward the riving knife (2) as indicated by the arrows
on the knob.
5. Insert the riving knife into the the space (3).
6. Slide the riving knife to the approximate position and
the lock pin will snap into place.
7. Tighten the riving knife lock knob.
12
3
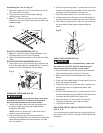
Before connecting the table saw to the power source
or operating the saw, always inspect the blade guard
assembly and riving knife for proper alingment and
clearance with saw blade. Check alingment after each
change of bevel angle.
NOTE: DO NOT operate saw if riving knife is not locked
in the thru-cut or non thru-cut position hole.
Fig. DD
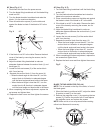
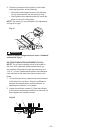
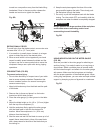
ALIGNING THE RIVING KNIFE TO BLADE
(FIG. DD, EE)
• To avoid injury from an accidental start, make
sure the switch is in the OFF position and the
plug is disconnected from the power source
outlet.
• Never operate this tool without the riving knife in
the correct position.
• Never operate this tool without the blade guard in
place for all through sawing operations.
• This adjustment was made at the factory, but it
should be rechecked and adjusted if necessary.
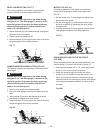
1. Remove the table insert and raise the blade to the
maximum height by turning the blade elevation
handwheel clockwise.
2. Remove the blade guard and anti-kickback pawl
assembly.
3. Adjust the blade to the 0° vertical position by unlocking
the blade tilting lock handle and turning the bevel
tilting handwheel counterclockwise, and then lock into
position.
4. To see if the blade (1) and riving knife (2) are
correctly aligned, lay a combination square (3) along
the side of the blade and against the riving knife
(making sure the square is between the teeth of the
blade).
5. Tilt the blade to the 45° position and check the
alignment again.
WARNING
!
WARNING
!
2
3
1