


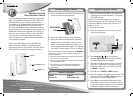

sensor magnet
screws (2) wall anchors (2)
what’s included
1. Use a screwdriver to loosen the screw and
remove the front of the sensor.
2. Insert two AAA batteries (not supplied).
3. After you replace the batteries, place the
magnet next to the sensor then move it
away. If the system does not chime, you
must register the sensor again. To register
the sensor, follow steps 1 thru 6 on page 1.
If the sensor stops working properly, or PROBLEM
appears on your console’s display, replace the
sensor’s batteries.
• Dispose of old batteries promptly and properly.
Do not burn or bury them.
• Use only fresh batteries of the required size and
recommended type.
• Do not mix old and new batteries, different
types of batteries, or batteries of different
capacities.
initializing your sensor
49-1001
Wireless Security
Door/Window Sensor
This wireless door/window sensor only works
with your Wireless Security Kit (49-1000). Your
Wireless Security Kit includes two sensors.
Purchase up to 28 additional (30 total) sensors
to expand and protect all 30 system zones.
You can add additional door/window sensors
and additional motion detectors, as long as the
additional units do not exceed 30 (number of
zones in your system). Refer to your 49-1000
user guide for more information on adding
motion detectors and door/window sensors to
your wireless system.
The sensor jack allows you to hardwire an
extra magnetic switch for additional door/
window protection.The sensor must be within
100 feet of the console to operate properly.
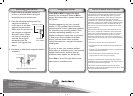
1. Press and hold down TEST on the sensor for
3-4 seconds, and then release it. The green
LED blinks twice.
Note: If you need to register the sensor a
second time, remove the batteries, and then
hold down TEST for 3-4 seconds to pick up a
random code.
2. Replace the cover.
3. Place the magnet next to the sensor, with
their arrows aligned.
4. Press menu start or on your system
console. ENTER PIN (Personal Identification
Number) appears on the display.
5. Use the console keypad to enter your four-
digit PIN. * appears on the display as you
press each digit. After you enter your PIN,
1. INSTALL appears.
6. Press ok and 1. INSTALL / ZONE appears.
7. Move the magnet away from the sensor. The
console chimes and ZONE 1 SET appears on
the display to confirm registration.
8. Press clear to navigate backwards through
the console menu options. Press 1 to return
to the main display, press 2 to stay in install
mode and register additional sensors.
registering your sensor
TEST
DELAY MIN/MAX
wall anchors (2)
screws (2)
magnet
sensor
Please read this user’s guide before
installing, setting up and using your new product
www.radioshack.com