


Page 18
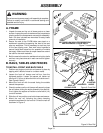
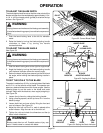
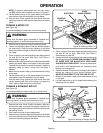
Figure 24: Arbor and Washer
OPERATION
B. SETTINGS AND ADJUSTMENTS
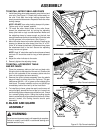
TO REMOVE THE BLADE
Use the two wrenches supplied with the saw in this proce-
dure to replace the blade.
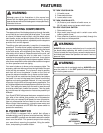
WARNING:
Unplug your saw and make sure the blade guard assembly
is installed and working properly to avoid serious personal
injury.
1. Raise the blade guard.
2. Remove the three screws from the throat plate and lift
the throat plate out of the slot.
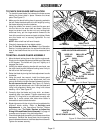
3. Push the bevel locking lever to the left for elevation
mode.
4. Raise the blade to its full height by turning the blade
adjusting handle clockwise.
5. Place the open end of the small hex wrench into the slot
beside the blade. The wrench will fit over two flats on the
arbor (blade shaft).
See Figure 24.
6. Fit the large hex wrench onto the arbor nut. Turn clockwise
and remove the nut, taking care not to drag your knuckles
across the blade.
NOTE: The arbor nut has left-hand threads.
7. Remove the outer blade washer from the arbor and then
remove the blade. Make sure that inner blade washer
and both spacers are tight against arbor shoulder.
8. Replace with a new blade. Make sure the blade teeth are
pointing forward, toward incoming work.
9. Put the outer blade washer and arbor nut back on,
aligning with the flats on the arbor. Tighten the nut with
a counterclockwise turn.
NOTE: Use care not to cross thread arbor nut. Do not
overtighten.
10. Rotate the blade by hand to make sure it is turning freely.
11. Check the riving knife and adjust if needed (See next
procedure).
12. Insert the throat plate, lower the blade, then secure the
throat plate with the three throat plate screws. Tighten
the screws firmly.
13. Push bevel locking lever to the left to allow blade
elevation and lowering.
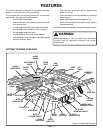
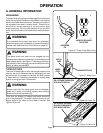
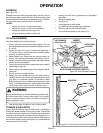
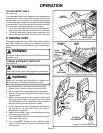
BLADE
GUARD
THROAT
PLATE
BEVEL
LOCKING LEVER
BLADE
ADJUSTING HANDLE
Figure 23: Overview of Saw
LARGE HEX
WRENCH
SMALL
SPACER
SMALL HEX
WRENCH
OUTER
BLADE WASHER
LARGE
SPACER
INNER
BLADE WASHER
TO
TIGHTEN
ARBOR NUT
TO
LOOSEN
NOTE: PLACE BLADE BETWEEN
INNER AND OUTER BLADE WASHER
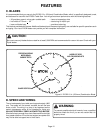
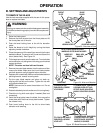
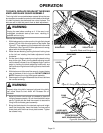
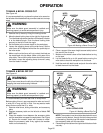
TO ANGLE BLADE,
PUSH BEVEL LOCKING
LEVER RIGHT.
TO LOWER BLADE, PUSH BEVEL
LOCKING LEVER LEFT AND
ROTATE BLADE ADJUSTING
HANDLE COUNTERCLOCKWISE
TO RAISE BLADE, PUSH BEVEL
LOCKING LEVER LEFT AND
ROTATE BLADE ADJUSTING
HANDLE CLOCKWISE.
TO LOCK BLADE ANGLE,
PUSH BEVEL LOCKING
LEVER LEFT.
ARBOR
Figure 25: Blade Movement Directions