


Page 21
OPERATION
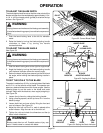
A simple push stick design is shown in figure 30. Remember
that the stick must always be narrower than the workpiece to
avoid risk of injury.
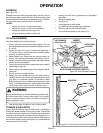
FEATHERB0ARD
A featherboard is a device used to help control the workpiece
by guiding it securely against the table or fence. Featherboards
are especially useful when ripping small workpieces and for
completing non-through cuts. Featherboards are made from
a solid piece of straight grain wood, free from splits or knots.
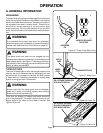
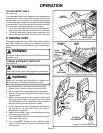
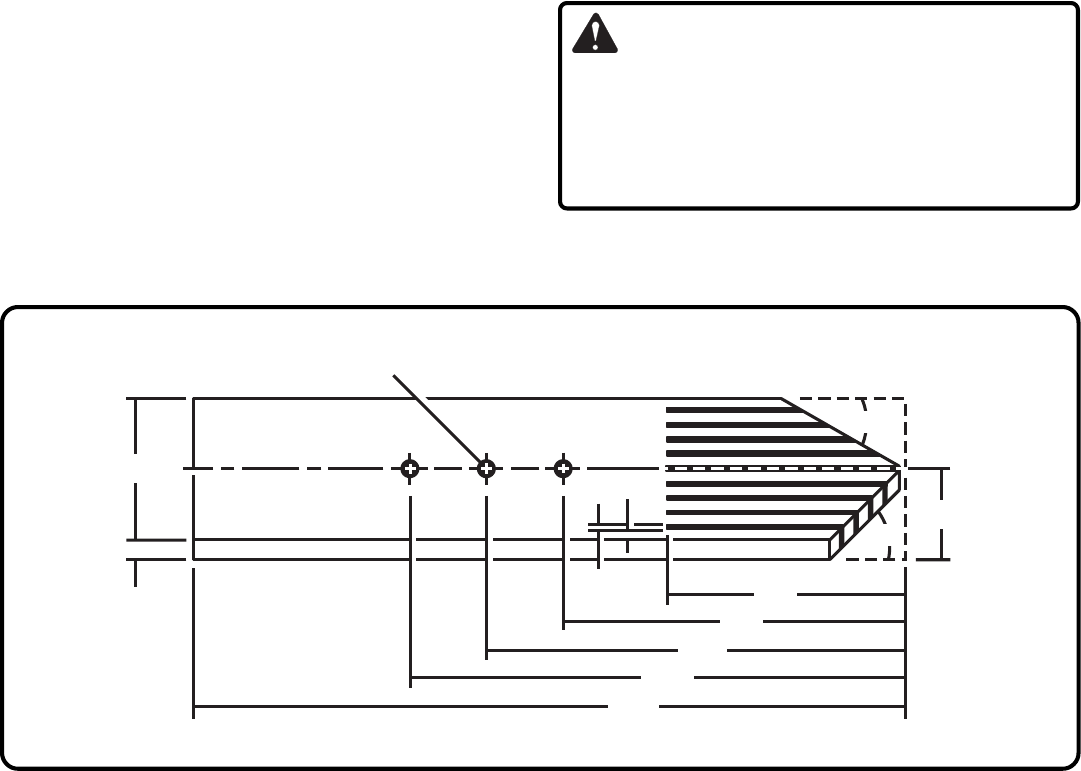
HOW TO MAKE A FEATHERBOARD
The featherboard is an excellent project for your BT3000.
Select a solid piece of lumber approximately 3/4 in. thick, 3-5/8 in.
wide and 18 inches long. Mark the center of the width on one
end of the stock. Miter one-half of the width to 30° and miter
the other half of the same end to 45°. See page 24 for
information on miter cuts. Mark the board from the point at 6
in., 8 in., 10 in. and 12 in. Drill a 3/8 in. hole at the 8 in., 10
in., and 12 in. marks as indicated in figure 31. Prepare the
saw for ripping as discussed on page 24. Set the rip fence to
allow approximately a 1/4 in. "finger" to be cut in the stock.
Feed the stock only to the mark previously made at 6 inches.
Turn the saw OFF and allow the blade to completely stop
rotating before removing the stock. Reset the rip fence and
cut spaced rips into the workpiece to allow approximately 1/
4 in. fingers and 1/8 in. spaces between the fingers.
See
Figure 31.
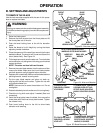
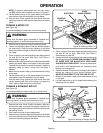
HOW TO MOUNT A FEATHERBOARD
Remove the adjusting clamp knob, bolt and washer from the
Miter Fence Holder. Place the bolt through one of the holes
in the featherboard. Positioning the featherboard will depend
on the placement of the bolt and the position of the sliding
miter table on the rails. Place the washer on the bolt and
attach the adjusting clamp knob, loosely. Position the
featherboard with the hex head of the bolt in the miter table
slot but do not tighten. Completely lower the saw blade.
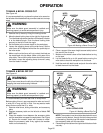
Position the rip fence to the desired adjustment for the cut to
be performed and lock. Place the workpiece against the
fence and over the saw blade area. Adjust the featherboard
to apply resistance to the workpiece just forward of the blade.
Securely tighten the adjusting clamp knob to secure the
featherboard in place. Attach a C-clamp to further secure the
featherboard to the edge of the Sliding Miter Table.
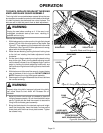
WARNING:
DO NOT locate the featherboard to the rear of the
workpiece. Kickback can result from the featherboard
pinching the workpiece and binding the blade in the saw
kerf if positioned improperly. Failure to heed this warning
can result in serious personal injury.
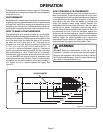
Figure 31: Featherboard
3/8 INCH DIAMETER
1/8 in.
1/4 in.
3/4 in.
3-5/8 in.
1-13/16 in.
30°
45°
6 in.
8 in.
10 in.
12 in.
18 in.