


Note!
Flashing light sources (e.g. safety strobe lights) can trigger the welding fil-
ter making it flash when no welding is occurring. This interference can occur
from long distances and/or from reflected light. Welding areas must be shiel-
ded from such interference.
Caution!
Should the Speedglas SL welding shield fail to switch to the dark state upon
ignition of an arc, stop welding immediately and inspect the welding filter as
described in these instructions. Continued use of the welding filter that fails
to switch to the dark state may cause temporary vision loss. If the problem
cannot be identified and corrected, do not use the welding filter, contact your
supervisor, distributor or 3M for assistance.
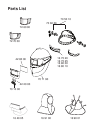
MAINTENANCE
Replacement of outer protection plate.
Remove the used outer protection plate and place the new outer protection
plate on the welding shield as indicated in
ffiigguurreess CC::11–– CC::22..
Note!
Make sure that the protection plate is correctly snapped in on all four
columns.
SSeeee ffiigguurree CC::33..
Replacement of inner protection plate.
The used inner protection plate is removed as illustrated in
ffiigguurree DD::11..
The
new inner protection plate should be inserted after the protective film is
removed as illustrated in
ffiigguurree DD::22..
Locate one of the sides by fitting the
corners according to
ffiigguurree DD::33
. Bend the middle part and fit the other two
corners. Make sure that the inner protection plate is mounted correctly as
illustrated in
ffiigguurree DD::33..
Replacement of welding filter.
The welding filter can be removed and replaced according to
ffiigguurree CC::11
aanndd EE::11..
Replacement of headband.
The headband can be replaced according to
ffiigguurree FF::11––FF::22..
Replacement of battery.
The welding filter must be removed to acess the battery compartment. Take
out the battery holder (use a small screwdriver if necessary).
1ï
9