


aigo S2902
| 8 |
Product Features
1. High transforming rate when converting light energy into electrical
energy.
2. Professional built-in circuit to prevent over-discharge, over-charge,
over-current and heat reduction when charging the built-in battery by
power adapter or sunlight.
3. Double short-circuit protection.
4. 3-Color LED Indicator.
aigo S2902
| 9 |
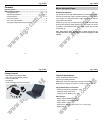
Product Overviews
Product Material: Fireproof plastic (ABS)
1——USB Interface (Output Interface)
2——LED Light (Torchlight function)
3——Control Switch (ON / OFF / LED)
4——3-Color LED Indicator (Intelligent LED Indicator)
5——DC Interface (Input Interface)
6——Output Voltage Switch (adjustable 4.5V / 5V / 6.3V / 9V)
7——Polycrystalline Silicon Solar Panel
aigo S2902
| 10 |
The 3-Color LED Indicator
A: When charging the built-in battery:
Red light: Low voltage < 3.8V.
Orange light: Mid voltage between 3.8V - 4.1V.
Green light: High voltage, fully charged.
Remarks: It is normal to see LED indicator flashing in Red, Orange and
Green color during the charging process.
B: When discharging the built-in battery:
Red light: Low voltage < 3.5V.
Orange light: Mid voltage between 3.5V - 4.1V.
Green light: High voltage between 4.1V - 4.2V.
Remarks:
1. When Control Switch is turned ON and is NOT charging any external
device, the LED indicator turns RED indicates that the power is low and it
requires charging immediately (using direct sunlight or power adapter).
2. When Control Switch is turned ON and while charging an external device,
LED indicator will flash in Red, Orange and Green color.
3. When Control Switch is turned ON and there is no LED indicator, it
indicates that the power is low and it requires charging immediately (using
direct sunlight or power adapter).
aigo S2902
| 11 |
Using aigo Portable Solar Charger S2902
IMPORTANT:
To stabilize the built-in battery on the solar charger, we would
recommend the following:
1. Use up the remaining power on the new solar charger until the
built-in battery is totally flat (Example: Connect it to a mobile phone and
starts charging).
2. When the built-in battery has finally gone flat, starts charging the
new solar charger for at least 12 hours using the power adapter (repeat
this process for the very first 3 times when using the new solar
charger).
Under direct sunlight, the product transforms light energy absorbed by
solar panel into electric energy and through the control circuit to store
electric energy in the built-in battery, or directly charge cell phone or
other digital products with the electric energy (It depends upon the
sunlight intensity. If the electronic mobile equipments need high current,
may cause no charging to external electronic products). During the
absence of sunlight, the product can be charged with the bundled
power adapter, and it also can charge other devices at the same time.