


- 14 - - 15 -
Be sure to keep fireplace dampers closed when not in use. They provide an
excellent escape route for heat, as well as humidity.
On occasion, indoor moisture producing activities such as clothes drying,
cooking, showers, etc., may raise the humidity level higher than it should be,
even though the Aprilaire humidifier is not operating. Telltale indications are
condensation or frost on cold surfaces such as windows, doors, walls, etc. If
such condensation persists for several hours, your home should be ventilated
to dissipate the potentially damaging excess moisture.
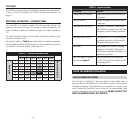
EFFECT OF WATER CHARACTERISTICS
ADDITIONAL INFORMATION
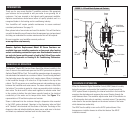
Your humidifier is designed to operate using softened or unsoftened, cold
tap water. Do not use hot water.
MAINTENANCE
Turn humidifier off and allow humidifier to drain. Disconnect power
before servicing.
Inspect Humidifier at approximately 500 hour intervals or several times
during the humidification season.
• Check system operation and inspect all plumbing connections and piping
for signs of cracks or leaks.
• Inspect drain line to make sure it is not blocked and has constant
downward slope. Clean or replace if necessary.
• Inspect steam hose to make sure it has no low spots and has constant
upward slope from humidifier to dispersion tube in duct. If dispersion
tube is mounted below humidifier, inspect drip tee drain.
Replace the canister annually and when prompted by the “Service” light.
Use Only Genuine Aprilaire Model 80 Canister.
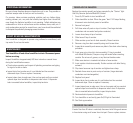
1. Press On/Off switch to turn humidifier off.
2. Allow humidifier to drain. When the green “drain” LED stops flashing,
disconnect main electrical power to humidifier.
3. Remove front panel.
4. Pull three wires off posts on top of canister. (Two large electrode
conductors and one water level probe conductor.)
5. Loosen hose clamp at top of canister.
6. Slide hose off top of canister.
7. Slide canister up and out of drain assembly. Discard canister.
8. Remove o-ring from drain assembly using small screw driver.
9. Inspect drain assembly and remove any debris. See drain valve cleaning
procedure.
10. Insert new o-ring into slot in drain assembly. (O-ring is provided
with Model 80 canister.) Dampen o-ring with water before inserting
canister. Do not use oil, grease, or any lubricant besides water.
11. Make sure strainer is inserted into bottom of new canister.
12. Insert canister into drain assembly. Position canister with label facing
outward.
13. Slip steam hose over top of canister and tighten hose clamp.
14. Reattach three wires to posts on top of canister. (Larger electrode
conductors are interchangeable.)
15. Replace front panel.
16. Inspect drain line to make sure it is not blocked and has constant
downward slope. Clean or replace if necessary.
17. Inspect steam hose to make sure it has no low spots and has constant
upward slope from humidifier to dispersion tube in duct. If dispersion
tube is mounted below humidifier, inspect drip tee drain.
18. Restore electrical power to humidifier.
19. Turn humidifier on and verify green On/Off light is illuminated.
20. See Start-up procedure.
TO REPLACE THE CANISTER
TO SERVICE FILL VALVE
If water flow from fill valve is restricted, disconnect inlet fitting and remove
in-line strainer using small screw from inlet port. Clean or replace strainer.