


4
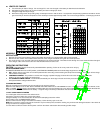
CHARGING SULFATED BATTERIES
If your battery has sat in the discharged state for an extended period of time, it can become SULFATED. This usually is seen as a white deposit near the top of the battery. The sulfate is formed when a battery with low
water levels remains discharged for an extended time. Sulfated batteries exhibit the characteristic of accepting no charge regardless of the rate of charge.
The charging method is two staged. The first stage of attempting to break down the sulfation to allow the battery to accept a charge must be closely watched to avoid excessive charge rates as the battery begins to
charge and overheating. The second stage is a slow charging to restore the battery to full charge.
READ AND FOLLOW ALL PRECAUTIONS AND WARNINGS IN YOUR INSTRUCTION MANUAL BEFORE ATTEMPTING TO CHARGE SULFATED BATTERIES. FAILURE TO OBSERVE THESE
WARNINGS MAY RESULT IN PROPERTY DAMAGE OR SERIOUS PERSONAL INJURY OR DEATH.
To recharge a sulfated battery:
1. Attach the battery clamps as described in the instruction manual.
2.
Always use the chargers lowest rate when turning the charger on. Set the charger to the chargers highest rate for the voltage of the battery being charged.
CAUTION:
NEVER CHARGE A BATTERY AT VOLTAGES RATES ABOVE THAT OF THE BATTERY.
3. The battery will show little or no amperage at the start of the charging process. This will continue until the sulfation begins to break down.
CAUTION:
AS THE SULFATION BREAKS DOWN, THE AMPERAGE MAY RAPIDLY RISE. CONSTANT ATTENTION
MUST BE OBSERVED TO PREVENT SERIOUS OVERHEATING OF THE BATTERY.
4. Lower the charge rate to the lowest rate for the voltage of battery being charged.
5.
Charge the battery at this low rate until the electrolyte reaches the fully charged state as described in the tables in your instruction manual. This may take as long as two or three days.
NOTE:
SOME BATTERIES MAY BE SO BADLY SULFATED THEY CAN NOT BE RESTORED TO A NORMAL OPERATING CONDITION, REGARDLESS OF THE RATE OF CHARGE OR THE
LENGTH OF TIME THE CHARGE IS APPLIED. IF THE BATTERY CANNOT BE RESTORED TO A FULLY CHARGED CONDITION BY A SLOW CHARGING, IT SHOULD BE REPLACED.
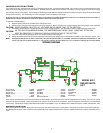
WIRING DIAGRAM
MODEL 6012
REPAIR PARTS
LIST
Timer w/knob ...................610895
Switch w/knob ..................605675
Axle w/nuts ....................610052
Wheels w/nuts ..................605672
Clamps ..........................6199
Jaw Kit ........................610970
Transformer ....................610819
Rectifier .......................610364
Fan Blade ......................610189
Fan Motor ......................610190
Leg ...........................605671
DC Circuit Breaker ...............610536
Amps Meter .................... 605204
AC Cord ....................... 610696
DC Cable Set .................... 610820
Handle ......................... 605213
AC Breaker ..................... 603597
Parts may be purchased from your local authorized service depot listed in the Service Procedure manual supplied with your product. If you elect to order parts from the factory you may do so by mail or phone. Minimum
order from the factory is $25.00. Orders received that are under the minimum will not be processed. Taxes and freight are extra and are not considered to be part of the dollar value of the order. We
C.O.D. policy. Cashier check, Money order, Mastercard or VISA are acceptable. If you use a Mastercard or VISA send only the number and expiration. DO NOT SEND THE CARD.
MAINTENANCE INSTRUCTIONS
Worn clamps should be replaced. Worn parts can lead to poor connections and present a safety hazard. See parts list for part number of DC Cable Set.
Any Maintenance or repair of this unit that involves disassembly of the cabinet should be done only by a qualified serviceman. Incorrect reassembly may result in a risk of electric shock when the unit is subsequently
used.