


3
20. LENGTH OF CHARGE
a. Test the battery for state of charge. Do not charge if it is over 75% charged or the battery is determined to be defective.
b. Set beginning amps charge rate for size of battery and state of charge per charts
c. Charge for length of time per charge,
d. Discontinue charge when the specific gravity of electrolyte reaches 1.260 or above. A temperature compensating hydrometer should be
used for this reading. Discontinue charge if the battery begins to gas excessively or when the temperature of the electrolyte reaches
approximately 120EF. Do not overcharge batteries. Overcharging results in excessive water loss and eventual damage to the battery.
ASSEMBLY INSTRUCTIONS
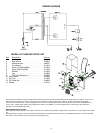
1. Remove the four screws from the back of charger and attach the handle in an upright position.
2. Remove the three screws on the bottom toward the front of the charger and attach the leg with
the screws provided.
3. Put one of the axle nut on one side of the axle by tapping the nut on with a hammer. Then slide
the axle through one of the wheels and then through the hole in the charger until it comes out
the other end. Put the other wheel and axle nut on.
OPERATING INSTRUCTIONS
CAUTION
- This battery charger must be fully assembled before operating. Failure to do so may
result in risk of injury.
TO CHARGE BATTERIES
Set the switch to the OFF position. Make the connections to the battery per the instructions in the
previous sections. Set the switch to the12HI position. DO NOT
use the START position to charge
batteries (Damage may occur to the battery). The Ammeter will show the amount of current
delivered to the battery. Length of charge should be per the above chart and instructions.
ENGINE START
Turn off all lights and accessories in the stalled vehicle. Connect the charger to battery per previous instructions. Charge the battery on 12 HI for at
least five minutes before attempting to start the vehicle. Put the switch in the START position. Start the vehicle with the charger connected to the
battery. Follow the duty cycle on the unit.
NOTE: DO NOT
crank the engine more than 20 seconds in any five minute period; excessive cranking may overheat and damage the starter. If the
vehicle fails to start, while waiting for the starter to cool, allow the charger to continue to charge the battery. Turn the switch to OFF and remove the
AC power cord from the electric outlet before disconnecting the DC clamps.