


3
WARNING - THIS APPLIANCE MUST BE EARTHED.
The AC cord of this unit was supplied without a plug so that you may install the correct plug as required by your local electrical codes. Your
electrrical outlet must also be properly installed and earthed per local codes.
The wires in the main lead are colored in accordance with the following code:
Green/Yellow: Earth
Blue: Neutral
Brown: Live
As the colors of the wires in the main lead of this unit may not correspond with the colored markings identifying the terminals in your plug,
proceed as follows:
a. The wire which is colored green/yellow must be connected to the terminal in the plug which is marked with the letter E, colored
green, green/yellow, or marked with the earth symbol.
b. The wire which is colored blue must be connected to the terminal which is marked with the letter N or colored black.
c. The wire which is colored brown must be connected to the terminal which is marked with the letter L or colored red.
10.
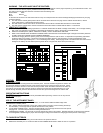
LENGTH OF CHARGE
a. Use a temperature compensating hydrometer or a voltmeter to determine the State of Charge of the battery. Do not charge a battery
that is over 75% charged or if the battery is determined to be defective. Refer to the STATE OF CHARGE table.
b. Determine the Battery Size, (SMALL, MEDIUM or LARGE). Refer to the BATTERY SIZE table.
c. Refer to the CHARGE RATE VS MINUTES CHARGE table to determine the recommended length of charge for the battery based on
its SIZE, STATE OF CHARGE and the CHARGING AMPERES.
d. Discontinue charging when the specific gravity of the electrolyte reaches 1,260 or above. A temperature compensating hydrometer
should be used for this reading. Discontinue charging if the battery begins to gas excessively or when the temperature of the
electrolyte reaches approximately 50
0
C. Do not overcharge the battery. Overcharging results in excessive water loss and eventual
damage to the battery and will create explosive gasses which can ignite and cause severe personal injury.
ASSEMBL
Y INSTRUCTIONS
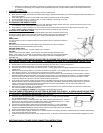
Remove the four handle mounting screws from the back panel. Insert the handle through the two holes in the
top panel and attach the handle to the rear of the charger using the four screws previously removed. Attach
the front leg to the base with the four hex head screws provided. Attach the wheels and axle to the base, tap
one axle nut onto the axle with a hammer, slide one wheel onto the axle with the whitewall facing out, push
the axle through the base, place the second wheel onto the axle, tap the remaining axle nut onto the axle.
OPERATING INSTRUCTIONS
CAUTION - The battery charger must be fully assembled before operating. Failure to do so may result in
the risk of personal injury.
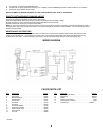
USE OF THE INSTRUMENT PANEL
The LENGTH OF CHARGE timer has an OFF position , a 0 to 90 minute TIMED CHARGE range and a
CONTINUOUS CHARGE position.
a. OFF - Always make sure the timer is in the OFF position before connecting or disconnecting the clamps
from the battery. The charger will not operate with the timer in this position.
b. 0 to 90 TIMED CHARGE range - The timer will automatically turn the charger off at the end of the pre-set
charging time. Turn the timer past 20 before setting the desired time.
c. CONTINUOUS CHARGE - The timer will not shut the charger OFF while in this position. Extended charging can be done if the operator
is knowledgeable in determining the proper rate and length of charge and monitors the charging process to prevent overcharging.
TO CHARGE BATTERIES
a. Make the connections to the battery per the instructions in the previous sections.
b. Determine if the battery is 6 or 12 volts and then set the CHARGE RATE switch to either the 6 or 12 LO position.