


3
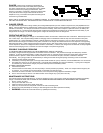
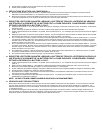
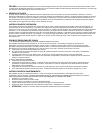
DANGER. Before using an adapter as illustrated, be
certain that the center screw of the outlet plate is grounded.
The green-colored rigid ear or lug extending from the adapter
must be connected to a properly grounded outlet - make
certain it is grounded. If necessary, replace the original outlet
cover plate screw with a longer screw that will secure the
adapter ear or lug to the outlet cover plate and make ground
connection to grounded outlet.
NOTE: USE OF AN ADAPTER IS NOT ALLOWED IN CANADA. IF A GROUNDING TYPE RECEPTACLE IS NOT AVAILABLE, DO NOT
USE THIS APPLIANCE UNTIL THE PROPER OUTLET IS INSTALLED BY A QUALIFIED ELECTRICIAN.
21.
CHARGE PERIOD
The approximate required time to bring a battery to full charge state depends upon the number of ampere-hours (AH) depleted from the
battery. AH's are determined by multiplying the number of hours times the number of amps supplied by a battery to a load and normally
indicated on the battery. For example, if a load was connected to a battery, which drew 7 amps for a period of 5 hours, the battery will
have supplied 35 AH. The approximate recharge time would then be calculated by dividing the 35 AH depleted from the battery, by the
charge rate of the charger. To allow for tapering of the charge rate add 25 percent to the charge time.
OPERATING INSTRUCTIONS
This battery charger is designed to charge 12 volt batteries of either conventional or maintenance-free construction. Rated output current
is 6 or 2 DC amps. The 2 ampere setting is better for charging small 12 volt batteries under 20 amp hour size used with motorcycles,
garden tractors, etc. When operating this charger, carefully follow the instructions in sections 17 and 18. When all connections have
been made and the charger is connected to AC power, the meter on the charger will indicate the amount of DC amperes of charge being
delivered to the battery. Either charging rate taper off to half of rating or less as the battery comes up to full charge. The actual charging
current depends on the AC line voltage and internal condition of the battery. Therefore, the charger's DC ammeter will not always register
maximum rated charging current. This does not mean the charger is not performing properly.
POSSIBLE CHARGING PROBLEMS
1. THE METER INDICATOR SWINGS TO THE EXTREME RIGHT SIDE OF THE METER:
This battery charger has been equipped with an automatic reset circuit breaker. This protects the charger from temporary overload
conditions. A severely discharged battery, a battery with shorted cells, or reversed charger connections at the battery will cause this
protective device to operate. Under these overload conditions, the circuit breaker will open, and when cooled down will reset
automatically. This cycling process can be identified by a clicking sound made during the opening and closing of the circuit breaker.
a. Check for reverse polarity connections.
b. If the battery is severely discharged, the charge meter needle will start to cycle up and down, and will stabilize after 15 to 20 minutes.
c. The battery may have one or more shorted cells. Cycling will start immediately and continue indefinitely. If cycling has not stopped
as outlined in (b), disconnect the charger (AC power cord first) and have the battery tested.
2. THERE IS NO METER READING:
a. Check switch position.
b. Check connections to the battery. Be sure the polarity is correct (red clamp to positive). "Rock" the clamps to bite through any dirt
or corrosion. If in a vehicle, be sure the terminals on the battery are clean and tight.
c. Check the AC outlet or extension cord connections, to be sure power is being supplied to the battery charger.
d. One or more cells may be shorted. The thermal switch in the charger may cycle (click on and off).
MAINTENANCE INSTRUCTIONS
This charger requires minimal maintenance. As with any appliance or tool, a few common sense rules will prolong the life of the battery
charger. ALWAYS BE SURE THE CHARGER IS UNPLUGGED BEFORE PERFORMING ANY MAINTENANCE OR CLEANING.
1. Store in a clean, dry place
2. Coil up the cords when not in use.
3. Clean the case and cords with a slightly damp cloth.
4. Clean any corrosion from the clamps with a solution of water and baking soda.
5. Examine the cords periodically for cracking or other damage and have them replaced if necessary.
6.
WARNING: All other service should be done by qualified personnel only.