cut green lumber can heavily load the saw which can lead to stalling. Push the saw slower when this occurs.
Don’t remove saw from work during a cut while the blade is moving.
Allow saw to reach full speed before blade contacts material to be cut. Starting the saw with the blade
against the work or pushed forward into cut can lead to stalling or sudden backward movement of saw.
Never attempt to lift the saw when making a bevel cut. This will lead to blade binding and stalling.
Always secure work to prevent workpiece movement during cut.
Do not try to force saw back on line if your cut begins to go off line. This can cause KICKBACK. Stop saw and
allow blade to coast down to a stop. Withdraw from cut and start a new cut on the line.
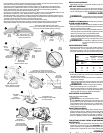
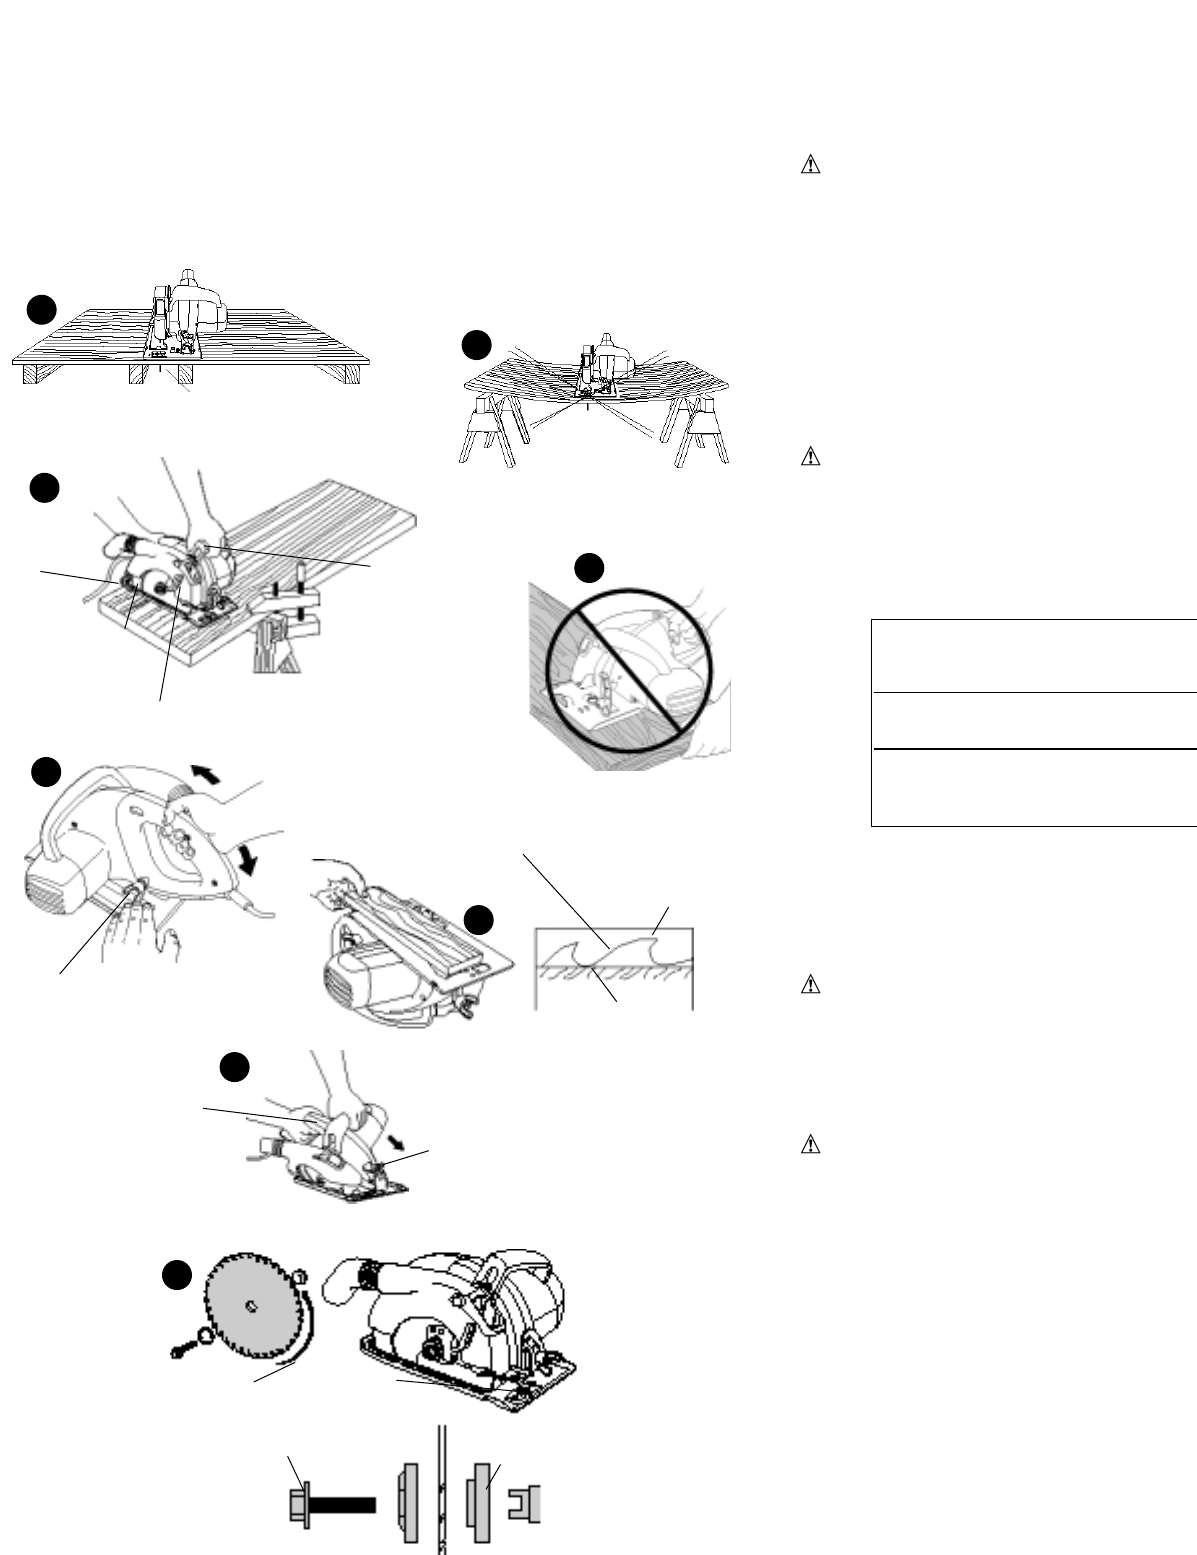
Set depth adjustment of saw such that one tooth of the blade projects below the workpiece as shown (Fig. 6).
Do not back up a rotating blade in the cut. Twisting the saw can cause the back edge of the blade to dig into
he material, climb out of the work and run back toward the operator.
Avoid cutting nails. Inspect for and remove all nails from lumber before cutting.
Some wood contains preservatives such as copper chromium arsenate (CCA) which can be toxic. When
cutting these materials, extra care should be taken to avoid inhalation and minimize skin contact.
8
Inner clamp washer
Rondelle de fixation externe
Roldana de sujeción exterior
Blade clamping screw
Vis de fixation de la lame
Tornillo de sujeción del disco
Direction of teeth
Sens des dents
Dirección de los dientes
Kerf Plate and Screw
Placa indicadora de
corte y tornillo
BEVEL ANGLE ADJUSTMENT
Adjust bevel angle (Fig. 7) using bevel adjustment knob and
KERF PLATE ADJUSTMENT
Adjust kerf plate (Fig. 8) to read zero when the bevel scale
and sliding the plate as necessary. Align mark on kerf plate
into cut. The kerf plate has lines for zero bevel and 45 degr
OPERATING INSTR
WARNING: To reduce the risk of serious personal
important safety warnings and instru
GENERAL CUTS (IMPORTANT: Read safety warnings and ins
GUARD AGAINST KICKBACK
With tool unplugged, follow all assembly, adjustment and set
Make sure lower guard operates. Select the proper blade for
•Measure and mark work for cutting.
•Support and secure work properly (See Safety Rules and
•Use appropriate and required safety equipment (See Saf
•Secure and maintain work area (See Safety Rules).
•Plug in saw. Make sure switch turns saw on and off.
•When operating the saw, keep the cord away from the c
caught in the workpiece or drag on its edge during the cu
WARNING: It is important to support the work pr
loss of control which could cause pe
support.
USE OF EXTENSION CORDS
Make sure the extension cord is in good condition before us
cords with the tool – that is, proper wire size for various len
current the tool will draw. Use of an undersized cord will ca
power and overheating. For proper size cords see chart be
POCKET CUTTING (SEE FIG. 10) TURN OFF AND UNP
Pocket cutting is used to cut a hole in a piece of material withou
• Measure and mark work.
• Tilt saw forward and rest front of the shoe on material to
of the drawn rectangle.
• Using the retracting lever, retract blade guard to an upwa
material, start motor and gradually lower the saw into th
WARNING: As blade starts cutting the material,
•Never tie the blade guard in a raised position.
•When the shoe rests flat on the material being cut, compl
•Allow the blade to come to a complete stop before lifting
•When starting each new cut, repeat the above steps.
DUST EJECTION AND COLLECTION
(
TURN OFF AND UNPLUG SAW)
CAUTION: Do not remove the ejection nozzle.
For dust collection, rotate dust ejection nozzle to point awa
guard to lock it in place. Slip a standard vacuum cleaner tu
can be placed such that it will not tip over or interfere with
cannot be done, do not use the vacuum cleaner. Turn on va
vacuum cleaner as required.
BLADE VIEWING WINDOW
Your saw features a blade viewing window through which y
enhancing cutting accuracy. Follow layout lines easily witho
the blade. To clean the window, first Turn Off and Unplug th
can reach beneath it to clean with a soft cloth. If necessary a
When you release the window, its internal spring will hold i
MAINTENAN
TURN OFF AND UNPLUG THE SAW WHEN PERFORM
MAINTENANCE.
Use only mild soap and damp cloth to clean the tool. Never
immerse any part of the tool into a liquid. IMPORTANT: To a
repairs, maintenance and adjustment should be performed
qualified service organizations, always using identical repla
ACCESSORI
Rddifihlil
Minimum Gage for Cord Se
Volts Total Length of Cord in
120V 0-25 26-50 51-100
240V 0-50 51-100 101-200
Ampere Rating
More Not more American Wire Gag
Than Than
0-6 18 16 16
6 - 10 18 16 14
10 - 12 16 16 14
12 - 16 14 12 Not Re
1
2
Correct
Correct
Correcto
Wrong
Incorrect
Incorrecto
Material bends on blade causing heavy loads or kickback
Le matériau plie au contact de la lame causant de lourdes surcharges ou des rebonds.
El material oprime el disco ocasionando sobrecarga o contragolpe
Support work near cut
Soutenir la pièce près de la ligne de coupe.
Apoye la pieza cerca del corte
3
4
Correct
Correct
Correcto
Auxiliary handle
Poignée auxiliaire
Mango auxiliar
Saw shoe
tin de scie
a de la sierra
Wrong
Incorrect
Incorrecto
Lower guard
Protecteur inférieur
Guarda inferior
Retracting lever
Ressort de rappel
Palanca del mecanismo retráctil
5
6
7
Bevel adjustment knob
Bouton de réglage pour coupes en biseau
Perilla de ajuste de bisel
Depth adjustment knob
Bouton de réglage de la profondeur
Perilla de ajuste de profundidad
Tip of tooth
Bout de la dent
Punta del diente
Surface of wood
Surface du bois
Superficie de madera
Proper depth: one tooth below surface of wood
Profondeur appropriée : une dent sous la surface du bois.
Profundidad correcta: un diente debajo de la superficie de madera
Switch Handle
Poignée de
l’interrupteur
Mango del interruptor


