


8 9
Safety Warnings and Instructions: Drilling
WARNING: Tool may stall (if overloaded or improperly used) causing a twist. To
reduce the risk of injury always expect the stall. Grip the tool firmly to control the
twisting action and prevent loss of control which could cause personal injury. If a stall
does occur, release the trigger immediately and determine the reason for the stall before
re-starting.
ASSEMBLY AND ADJUSTMENT
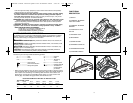
WALL MOUNTING THE CHARGING CRADLE (FIGURES A, B)
The charging cradle can be placed on a level surface or mounted to a wall. Use the
hardware provided only if hanging on conventional sheet rock or plaster walls. If not
hanging on conventional sheet rock or plaster walls, please use the appropriate
fasteners for that material.
• Choose a location that is within reach of an electrical outlet.
• If wall mounting, space mounting screws the same distance apart (3 inches 75mm) as
the slots on the back of the charger shown in figure A. NOTE:Avoid damaging the cord
while fixing the charging cradle (10) to the wall.
• Plug in charger and place the product in position (figure B). Make sure the charge
indicator light (9) is on. If the indicator light is not on, adjust unit to make sure charging
contacts (8) are touching.
INSERTING AND REMOVING BITS (FIGURE C)
• To install a bit simply insert it into the cavity in the hex spindle (6) as shown in figure C.
To remove the bit pull it straight out.
TORQUE CONTROL (FIGURE D)
Your screwdriver is equipped with a six position clutch collar (4). When the tool reaches the
preselected torque setting the clutch slips, thus limiting how tightly a screw is driven.
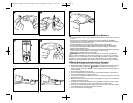
• The toolʼs motor will continue to run as long as the switch button is depressed.
• To set the toolʼs torque, rotate the adjustable clutch collar (4) clockwise or
counterclockwise as required (figure D). The larger the screw icon, the higher the torque.
Each click in a clockwise direction (facing the spindle ) means an increase in the torque
produced.
FORWARD / REVERSE / LOCK OFF SLIDER (FIGURE E)
• To select forward or reverse rotation, use the forward / reverse slider (2) (see arrows on
the slider). A window (3) on the top of the unit will display the rotating direction with an
arrow (figure E).
NOTE: When the forward / reverse slider is in the central position the tool is locked off to
prevent accidental actuation or battery discharge.
OPERATING INSTRUCTIONS
SWITCHING ON AND OFF
• To run the tool, press the switch (1).
• To stop the tool, release the switch.
• To lock the tool in the off position, move the forward / reverse slider (2) to the central
position.
SCREW DRIVING
• Insert the appropriate screwdriver bit into the hex spindle.
• Select forward or reverse rotation.
• Set the clutch collar to the smallest screw icon and begin driving screw (low torque).
• If the clutch ratchets too soon, adjust the clutch collar to increase the torque as required.
SCREW DRIVING USING THE BUILT-IN SCREW HOLDER (FIGURES F - I)
The screw holder (7) can be used with both one and two inch screwdriver bits. It cannot
be used with bit tip holder extensions.
To use the screw holder:
• Grasp the screw holder carrier and pull it out from the screwdriver. (figure F)
• Place desired screw onto screw holder carrier (figure G). Ensure screw threads rest on
screw carrier as shown.
10.Do not attempt to open the charger. There are no customer serviceable parts inside.
Return to any authorized Black & Decker service center.
11. DO NOT incinerate the tool or batteries even if they are severely damaged or
completely worn out. The batteries can explode in a fire. Toxic fumes and materials
are created when lithium ion battery packs are burned.
12. Do not charge or use battery in explosive atmospheres, such as in the presence of
flammable liquids, gases or dust. Inserting or removing the battery from the charger
may ignite the dust or fumes.
13. If battery contents come into contact with the skin, immediately wash area with mild
soap and water. If battery liquid gets into the eye, rinse water over the open eye for
three minutes or until irritation ceases. If medical attention is needed, the battery
electrolyte is composed of a mixture of liquid organic carbonates and lithium salts.
WARNING: Burn hazard. Battery liquid may be flammable if exposed to spark or
flame.
Charging Procedure
THE BATTERIES IN YOUR TOOL ARE NOT FULLY CHARGED AT THE FACTORY.
BEFORE ATTEMPTING TO CHARGE THEM, THOROUGHLY READ ALL OF THE
SAFETY INSTRUCTIONS.
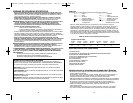
To charge your screwdriver, follow the steps below.
1. Plug the charger into any standard 120 Volt 60 Hz electrical outlet.
2. Place the screwdriver into the charging cradle(10) making sure to match the charging
contacts (8) on the handle of the screwdriver with the contacts in the charging cradle.
The red (charging) light will illuminate indicating that the charging process has started.
3. Let the tool charge initially for at least 12 hours. After the initial charge, your tool
should be fully charged in 12 hours from a fully discharged condition. Recharge
discharged batteries as soon as possible after use or battery life may be greatly
diminished. For longest battery life, do not discharge batteries fully. It is
recommended that the batteries be recharged after each use
Important Charging Notes
1. Your tool was sent from the factory in an uncharged condition. Before attempting to
use it, it must be charged for at least 12 hours.
2. DO NOT charge the batteries in an air temperature below 40°F (4,5 °C) or above
105°F (+40,5 °C). This is important and will prevent serious damage to the batteries.
Longest life and best performance can be obtained if batteries are charged when air
temperature is about 75°F.
3. While charging, the charger may hum and become warm to touch. This is a normal
condition and does not indicate a problem.
4. If the batteries do not charge properly—(1) Check current at receptacle by plugging in
a lamp or other appliance. (2) Check to see if receptacle is connected to a light switch
which turns power off when you turn out the lights. (3) Move charger and tool to a
surrounding air temperature of 40°F (4,5 °C) to 105°F (+40,5 °C). (4) If the charger
is mounted on a wall make sure the charge indicator light is on. If the indicator
light is not on, push unit down to make sure charging contacts are touching. (5)
If the receptacle and temperature are OK, and you do not get proper charging, take or
send the tool and charger to your local Black & Decker service center. See Tools
Electric in yellow pages.
5. The tool should be recharged when it fails to produce sufficient power on jobs which
were easily done previously. DO NOT CONTINUE using product with its batteries in a
depleted condition.
6. To prolong battery life, avoid leaving on charge for extended periods of time (over 30
days without use). Although extended charging is not a safety concern, it can
significantly reduce overall battery life.
90564630 li4000 revision.qxd:??????-00 BDL500 laser 5/25/10 7:45 AM Page 8