


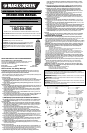
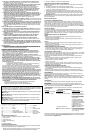

FEATURES (FIGURE A)
1. On/off switch with forward/reverse function
2. Torque adjustment collar
3. Bit holder
4. Handle adjustment button
5. Handle
6. Battery cover
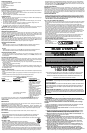
CHARGING THE SCREWDRIVER
Before attempting to charge your screwdriver, thoroughly read all of the safety instructions. To
charge your screwdriver, follow the steps below.
1. Plug the output cord of the charger (7) into the socket in the back half of the screwdriver
handle (8) as shown in Figure B.
2. Plug the charger into any standard electrical outlet.
CHARGING NOTES
NOTE: The tool was sent from the factory in an uncharged condition. Before attempting to
use it, it must be charged for 12 hours.
1. Charger will work best at normal room temperature.
2. The charger plug and the tool handle may become warm while charging. This is normal
and does not indicate a problem.
3. The tool can be left on charge as long as you desire. A minimum charge time of 12
hours is required to recharge a completely discharged tool.
4. For most fix up jobs a charge of 3 to 4 hours will be adequate.
WARNING: When disconnecting the screwdriver from the charger, be sure to unplug the
charger from the outlet first then disconnect the charger cord from the screwdriver.
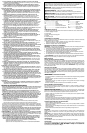
Operating Instructions
REMOVING AND INSTALLING BITS
To install a screwdriver bit (9) Fig. C simply insert it into the cavity in the bit holder (3) until it
snaps into place. To remove the bit pull it straight out. If bit does not fit, rotate the bit and
re-insert it. To insert a bit tip (11) first insert a bit tip holder (10) into the spindle and then insert
the bit tip into the holder. NOTE: Screwdriver bit types and quantity may vary.
ADJUSTING THE HANDLE
For optimum versatility, the handle can be be set to different positions as shown in Fig. D. To
adjust the handle, press the handle adjustment button (4) and swivel the handle into the
desired position. Release the button and the handle will lock in that position. NOTE: To avoid
being pinched, grasp the handle below the pinch point shown in Figure D.
OPERATING IN POWER MODE
Forward
• Slide the button (1) shown in Fig. E to the right, exposing the triangle pointing forward.
• Press the button and the tool will run; release the button and the tool will stop.
Reverse
• Slide the button (1) shown in Fig. E to the left, exposing the triangle pointing backward.
• Press the button and the tool will run; release the button and the tool will stop.
OPERATING IN MANUAL MODE
•The tool can be used as a conventional non-powered screwdriver whenever the
forward/reverse button is not depressed. With the button (1) in the middle position, the tool
will not activate.
SETTING THE TORQUE (FIGURE F)
This tool is fitted with a collar to set the torque for tightening screws. Large screws and hard
workpiece materials require a higher torque setting than small screws and soft workpiece
materials. The collar has a wide range of settings to suit your application.
• Turn the collar (2) to the desired setting. If you do not yet know the appropriate setting,
proceed as follows:
• Set the collar to the lowest torque setting.
• Tighten the first screw.
• If the clutch ratchets before the desired result is achieved, increase the collar setting and
continue tightening the screw. Repeat until you reach the correct setting. Use this setting for
the remaining screws.
Hints for optimum use
• Always use the correct type of screwdriver bit. Never use a screwdriver bit tip without a bit tip
holder
• If screws are difficult to tighten, try applying a small amount of washing liquid or soap as a
lubricant.
• Use the spindle lock to loosen very tight screws or to firmly tighten screws.
• Always hold the tool and screwdriver bit in a straight line with the screw.
TROUBLESHOOTING
Problem
Possible Cause Possible Solution
• Unit will not start. • Battery not charged. • Check battery charging
requirements.
• Battery will not charge. • Charger not plugged in. • Plug charger into a working
outlet. Refer to “Important
Charging Notes” for more
details.
• Check current at receptacle
by plugging in a lamp or
other appliance.
• Check to see if receptacle
is connected to a light
switch which turns power off
when you turn out the lights.
• Surrounding air temperature • Move charger and tool to a
too hot or too cold. surrounding air temperature
of above 40 degree F(4,5°C)
or below 105 degree F
(+40,5°C).
For assistance with your product, visit our website www.blackanddecker.com for the
location of the service center nearest you or call the BLACK & DECKER help line at
1-800-544-6986.
Maintenance
Use only mild soap and damp cloth to clean the tool. Never let any liquid get inside the tool;
never immerse any part of the tool into a liquid.
IMPORTANT: To assure product SAFETY and RELIABILITY, repairs, maintenance and
adjustment (other than those listed in this manual) should be performed by authorized service
centers or other qualified service organizations, always using identical replacement parts.
Lubrication
Black & Decker tools are properly lubricated at the factory and are ready for use.
Accessories
Recommended accessories for use with your tool are available from your local dealer or
authorized service center. If you need assistance regarding accessories, please call:
1-800-544-6986.
WARNING: The use of any accessory not recommended for use with this tool could be
hazardous.
THE RBRC™ SEAL
The RBRC™ (Rechargeable Battery Recycling Corporation)
Seal on the nickel-cadmium battery (or battery pack) indicates that the costs to
recycle the battery (or battery pack) at the end of its useful life have already been paid by
Black & Decker. In some areas, it is illegal to place spent nickel-cadmium batteries in the
trash or municipal solid waste stream and the RBRC program provides an environmentally
conscious alternative.
RBRC in cooperation with Black & Decker and other battery users, has established programs
in the United States and Canada to facilitate the collection of spent nickel-cadmium batteries.
Help protect our environment and conserve natural resources by returning the spent nickel-
Avertissements de sécurité généraux pour les outils
électriques
AVERTISSEMENT! Lire tous les avertissements de sécurité et toutes les
directives. Le non-respect des avertissements et des directives pourrait se solder
par un choc électrique, un incendie et/ou une blessure grave.
Conserver tous les avertissements et toutes les directives pour un usage
ultérieur.
Le terme «outil électrique» cité dans les avertissements se rapporte à votre outil
électrique à alimentation sur secteur (avec fil) ou par piles (sans fil).
1) Sécurité du lieu de travail
a) Tenir la zone de travail propre et bien éclairée.
Les endroits sombres sont souvent
des causes d'accidents.
b) Ne pas faire fonctionner d’outils électriques dans un milieu déflagrant, soit en
présence de liquides inflammables, de gaz ou de poussière.
Les outils
électriques produisent des étincelles qui peuvent enflammer la poussière ou les vapeurs.
c) Éloigner les enfants et les curieux au moment d’utiliser un outil électrique.
Une
distraction pourrait vous en faire perdre la maîtrise.
2) Sécurité en matière d’électricité
a) Les fiches des outils électriques doivent correspondre à la prise. Ne jamais
modifier la fiche en aucune façon.
Ne jamais utiliser de fiche d’adaptation avec un
outil électrique mis à la terre. Le risque de choc électrique sera réduit par l’utilisation de
fiches non modifiées correspondant à la prise.
b) Éviter tout contact physique avec des surfaces mises à la terre comme des
tuyaux, des radiateurs, des cuisinières et des réfrigérateurs.
Le risque de choc
électrique est plus élevé si votre corps est mis à la terre.
c) Ne pas exposer les outils électriques à la pluie ou à d'autres conditions où il
pourrait être mouillé.
La pénétration de l’eau dans un outil électrique augmente le
risque de choc électrique.
d) Ne pas utiliser abusivement le cordon d’alimentation. Ne jamais utiliser le
cordon pour transporter, tirer ou débrancher un outil électrique. Tenir le cordon
éloigné de la chaleur, de l’huile, des bords tranchants ou des pièces mobiles.
Les
cordons endommagés ou emmêlés augmentent les risques de choc électrique.
IMPORTANTS RENSEIGNEMENTS :
CHARGEMENT : il faut charger le tournevis pendant 12 heures avant de l’utiliser
pour la première fois.
FONCTIONNEMENT : le bouton noir doit être placé en position de marche avant
ou de marche arrière. Enfoncer le bouton pour faire fonctionner l’outil dans un
sens ou dans l’autre et le mettre en position centrale pour verrouiller l’outil en
position d’arrêt.
INSTALLATION DE LA MÈCHE : pour installer une mèche, il suffit de l’enfoncer
fermement dans la cavité de la broche jusqu’à ce qu’elle soit bien enclenchée. Si
la mèche ne s’insère pas correctement dans la broche, la faire pivoter et l’insérer
à nouveau.
TT
TT
OO
OO
UU
UU
RR
RR
NN
NN
EE
EE
VV
VV
II
II
SS
SS
SS
SS
AA
AA
NN
NN
SS
SS
FF
FF
II
II
LL
LL
ÀÀ
ÀÀ
33
33
PP
PP
OO
OO
SS
SS
II
II
TT
TT
II
II
OO
OO
NN
NN
SS
SS
DD
DD
EE
EE
33
33
,,
,,
66
66
VV
VV
OO
OO
LL
LL
TT
TT
SS
SS
,,
,,
MM
MM
OO
OO
DD
DD
ÈÈ
ÈÈ
LL
LL
EE
EE
99
99
00
00
77
77
88
88
cadmium battery to an authorized Black & Decker service center or to your local retailer for
recycling. You may also contact your local recycling center for information on where to drop
off the spent battery, or call 1-800-8-BATTERY.g center for information on where to drop off
the spent battery, or call 1-800-8-BATTERY.
BATTERY PACK REMOVAL
IMPORTANT: This tool is designed for easy disassembly for the purpose of battery pack
removal. It is not designed to be re-assembled by the consumer. Before attempting to disas-
semble this tool, turn it on and run it in either direction until it stops to ensure a complete dis-
charge of the battery pack. To disassemble the tool, remove the screws in the side of the tool
body. Take the two body halves apart and you will find the battery pack. Lift the battery pack
out and pull off the terminal clips.
SERVICE INFORMATION
All Black & Decker Service Centers are staffed with trained personnel to provide customers
with efficient and reliable power tool service. Whether you need technical advice, repair, or
genuine factory replacement parts, contact the Black & Decker location nearest you. To find
your local service location, refer to the yellow page directory under "Tools—Electric" or call:
1-800-544-6986 or visit www.blackanddecker.com
FULL TWO-YEAR HOME USE WARRANTY
Black & Decker (U.S.) Inc. warrants this product for two years against any defects in material
or workmanship. The defective product will be replaced or repaired at no charge in either of
two ways.
The first, which will result in exchanges only, is to return the product to the retailer from
whom it was purchased (provided that the store is a participating retailer). Returns should be
made within the time period of the retailer’s policy for exchanges (usually 30 to 90 days after
the sale). Proof of purchase may be required. Please check with the retailer for their specific
return policy regarding returns that are beyond the time set for exchanges.
The second option is to take or send the product (prepaid) to a Black & Decker owned or
authorized Service Center for repair or replacement at our option. Proof of purchase may be
required. Black & Decker owned and authorized Service Centers are listed under "Tools-
Electric" in the yellow pages of the phone directory and on our website
www.blackanddecker.com.
This warranty does not apply to accessories. This warranty gives you specific legal rights
and you may have other rights which vary from state to state. Should you have any
questions, contact the manager of your nearest Black & Decker Service Center. This
product is not intended for commercial use.
FREE WARNING LABEL REPLACEMENT: If your warning labels become illegible or are
missing, call 1-800-544-6986 for a free replacement.
AVANT DE RETOURNER CE PRODUIT POUR QUELQUE
RAISON QUE CE SOIT, COMPOSER LE
1-800-544-6986
AVANTD’APPELER, AYEZ EN MAIN LE N° DE CATALOGUE ETLE CODE DE DATE. DANS LAPLUPART
DES CAS, UN REPRÉSENTANT DE BLACK & DECKER PEUTRÉSOUDRE LE PROBLÈME PAR
TÉLÉPHONE. SI VOUS AVEZ UNE SUGGESTION OU UN COMMENTAIRE, APPELEZ-NOUS. VOS
IMPRESSIONS SONT CRUCIALES POUR BLACK & DECKER.
M
M
ERCI
ERCI
D
D
’
’
A
A
VOIR
VOIR
CHOISI
CHOISI
B
B
LACK
LACK
&
&
D
D
ECKER
ECKER
!
!
V
V
ISITEZ
ISITEZ
WWW
WWW
.B
.B
LACKAND
LACKAND
D
D
ECKER
ECKER
.
.
COM
COM
/P
/P
RODUCT
RODUCT
R
R
EGISTRA
EGISTRA
TION
TION
POUR
POUR
ENREGISTRER
ENREGISTRER
VOTRE
VOTRE
NOUVEAU
NOUVEAU
PRODUIT
PRODUIT
.
.
MODE D’EMPLOI
CONSERVER CE MANUEL POUR UN USAGE ULTÉRIEUR.
Imported by:
Black & Decker (U.S.) Inc.,
701 E. Joppa Rd.
Towson, MD 21286 U.S.A.
See ‘Tools-Electric’
– Yellow Pages –
for Service & Sales