


Charging a Very Cold Battery
If the battery to be charged is very cold (in temperatures below freezing — 0°C/ 32°F), it cannot accept a high rate of charge.
The battery will accept a higher charge rate as it warms. NEVER ATTEMPT TO CHARGE A FROZEN BATTERY.
Alternator Check Fault Condition Messages
If there is a problem with the connections or battery, the LCD will display the appropriate fault condition message, as follows:
CARE AND MAINTENANCE
With proper care and minimal maintenance, this unit will provide years of dependable service. For maximum performance,
manufacturer recommends:
• After each use, clean the battery charger clamps — be sure to remove any battery fluid that will cause corrosion of the clamps.
• Clean the outside case of the charger with a soft cloth and, if necessary, mild soap solution.
• Do not allow liquid to enter the charger. Do not operate when charger is wet.
• Keep the charger cords loosely coiled during storage t
o prevent damage to the cords.
Fault Message Explanation/Recommendation
CHECK CLAMP CONNECTION TO THE
BATTERY
When this message appears, the most common cause is poor connection to
battery.
• Observing the “Important Safety Instructions” at the front of this manual,
disconnect AC cord and clamps, clean battery terminal and reconnect.
• If the situation persists, we recommend taking your battery to a certified
automotive service center for evaluation.
REVERSE CLAMPS ON BATTERY
(Status LED lights red and continuous
warning tone sounds)
The connections to the battery’s positive and negative terminals are incorrect.
Observing the “Important Safety Instructions” at the front of this manual,
disconnect AC cord and clamps and reconnect to battery with correct polarity.
Fault Message Explanation/Recommendation
OVERTIME CONDITION The charging cycle has exceeded 18 hours. This may occur under the following
conditions:
• Battery (or batteries, in the case of a battery bank) being charged has/have a
capacity over 180 Ah.
Disconnect charger from AC outlet and reconnect to start a another 18-hour
cycle. Repeat as necessary according to capacity.
• If the battery capacity is ≤ 180 Ah and this fault message appears, the battery
being charged is possibly defective.
We recommend taking your battery to a certified automotive service center for
service or replacement.
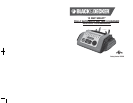
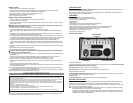
SMART CHARGE
1.Set up the unit as described in the “Setting Up the Unit” section, selecting the Smart Charge function before connecting the
clamps to the battery.
2.When the unit is done analyzing the battery, it will begin the recharging process. The LCD will then display the battery
voltage (for example: CHARGING / 12.5 VOLTS). As the battery charges, the arrow on the Charging Gauge will move
indicating the current percent of charge in the battery, from the red zone (0-25% charged) toward the green zone (90-100%
charged).
3.When the unit is fully charged, the LCD displays BATTERY
IS FULLY CHARGED. The status LED will light green.
4.Disconnect first the AC cord, then the clamps to shut the unit off. Observe the “Important Safety Instructions” at the front of
this manual when disconnecting.
ALTERNATOR CHECK
Part 1
No Load (Turn OFF all vehicle’s accessories): The battery must be fully charged before testing the alternator. Run the engine
long enough to achieve normal idle speed and verify there is a no-load voltage.
1.Set up the unit as described in the “Setting Up the Unit” section, selecting the Alternator Check function before connecting
the clamps to the battery. ANALYZING ALTERNATOR will display on the LCD.
3.Once the unit has finished checking, the LCD will display either ALTERNATOR GOOD (the status LED will light green) or
ALTERNATOR BAD OR ENGINE NOT RUNNING (the status LED will light red).
Part 2
Under Load (Accessories ON): Next, load the alternator by turning on as many accessories as possible (except for A/C and
DEFROST) and repeat the above four steps.
After completing both alternator checks, disconnect the AC cord and clamps, observing the “Important Safety Instructions” at
the front of this manual.
If the first alternator check indicates a good alternator and the second indicates the alternator is not good, the problem could
stem from: loose fan belts, an intermittent diode failure or possibly bad connections between the battery and alternator and/or
ground.
ALTERNATOR BAD OR ENGINE NOT RUNNIN
G may display because someone has added a number of accessory loads on the
charging system, thereby increasing current demand from the alternator. MAKE SURE THAT THE ALTERNATOR IS RATED TO
SUPPORT THE APPLICATION.
Note: This check may not be accurate for every make, manufacturer and model of vehicle.
Check only 12 volt systems.
TROUBLESHOOTING
General
The unit will turn on automatically after being properly connected to the battery. If it does not come on, either it is not connected
properly to the terminals or the voltage of the battery to be serviced is too low (below 0.3 volts).
Smart Charge Fault Condition Messages
If there is a problem with the connections or battery, the LCD will display the appropriate fault condition message, as follows:
Fault Message Explanation/Recommendation
CHECK CLAMP CONNECTION TO THE
BATTERY
When this message appears, the most common cause is poor connection to
battery.
• Observing the “Important Safety Instructions” at the front of this manual,
disconnect AC cord and clamps, clean battery terminal and reconnect.
• If the situation persists, we recommend taking your battery to a certified
automotive service center for evaluation.
REVERSE CLAMPS ON BATTERY
(Status LED lights red and continuous
warning tone sounds)
The connections to the battery’s positive and negative terminals are incorrect.
Observing the “Important Safety Instructions” at the front of this manual,
disconnect AC cord and clamps and reconnect to battery with correct polarity.
REPLACE OR SERVICE BATTERY The battery being charged either has an internal open or shorted cell or is highly
sulfated and cannot accept normal charge current. We recommend taking your
battery to a certified automotive service center for evaluation.
COOL DOWN CYCLE
(Status LED lights red)
The ventilation grill that prevents the air from flowing in and out of the charger
may be blocked.
• Observing the “Important Safety Instructions” at the front of this manual,
disconnect AC cord and clamps, allow the unit to cool for 30 minutes and
reconnect.
• Make sure there is ample ventilation before resuming operation.
BLACK DECKER ACCESSORIES GARAGE ACCESSORIES