


8
whenever you desire with no adverse affect on the battery pack.
5. Foreign materials of a conductive nature such as, but not limited to, steel wool,
aluminum foil, or any buildup of metallic particles should be kept away from charger
cavities. Always unplug the charger from the power supply when there is no battery
pack in the cavity. Unplug charger before attempting to clean.
6. Do not freeze or immerse charger in water or any other liquid.
WARNING: Shock hazard. Do not allow any liquid to get inside charger. Never
attempt to open the battery pack for any reason. If the plastic housing of the battery pack
breaks or cracks, return to a service center for recycling.
Safety Warnings and Instructions: Drills
WARNING: Before using tool, read all instructions and cautionary markings on tool.
WARNING: Drill may stall (if overloaded or improperly used) causing a twist.
Always expect the stall. Grip the drill firmly with two hands to control the twisting action
and prevent loss of control which could cause personal injury. If a stall does occur,
release the trigger immediately and determine the reason for the stall before re-starting.
Operating Instructions
Installing and Removing the Battery Pack From the Tool
CAUTION: Make certain the lock-off button is engaged to prevent switch actuation
before removing or installing battery.
TO INSTALL BATTERY PACK: Insert battery pack (6) firmly into tool until an audible
click is heard as shown in Figure B. Ensure battery pack is fully seated and fully
latched into position.
TO REMOVE BATTERY PACK: Depress the battery release button (7) as shown in
Figure C and pull battery pack out of tool.
Trigger Switch & Forward/Reverse Button - Figure D
Figure D. The farther the trigger is depressed, the higher the speed of the drill.
also serves as a lock off button.
control button on the right side of the tool.
tool.
changing the position of the control button, be sure the trigger is released.
Adjusting Torque Control - Figure E
This tool is fitted with a torque adjustment collar (3) to select the operating mode and to
set the torque for tightening screws. Large screws and hard workpiece materials require
a higher torque setting than small screws and soft workpiece materials.
For drilling in wood, metal and plastics, set the collar to the drilling position symbol
appropriate setting, proceed as follows:
and continue tightening the screw. Repeat until you reach the correct setting. Use
this setting for the remaining screws.
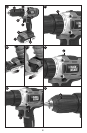
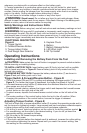
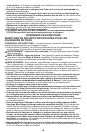
FUNCTIONAL DESCRIPTION
Figure A
3. Torque Adjust Collar
5. Keyless Chuck
6. Battery
7. Battery Release Button
9. Bit Tip Holder