


13
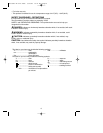
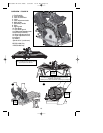
SHOE ADJUSTMENT FOR 90° CUTS
IF ADDITIONAL ADJUSTMENT IS NEEDED:
• Adjust the saw to 0° bevel.
• Retract blade guard (11). Place the saw on blade side.
• Loosen bevel adjustment knob (13). Place a square against the blade (10) and shoe (8)
to adjust the 90° setting.
• Loosen jam nut and move the adjustment screw (13a) so that the shoe will stop at the
proper angle and retighten jam nut.
• Confirm the accuracy of the setting by checking the squareness of an actual cut on a
scrap piece of material.
OPERATING INSTRUCTIONS
WARNING: To reduce the risk of serious personal injury, read, understand and
follow all important safety warnings and instructions prior to using tool.
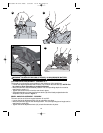
GENERAL CUTS
GUARD AGAINST KICKBACK
With battery removed, follow all assembly, adjustment and set up instructions.
Make sure lower guard operates. Select the proper blade for the material to be cut.
• Measure and mark work for cutting.
• Support and secure work properly (See Safety Rules and Instructions).
• Use appropriate and required safety equipment (See Safety Rules).
• Secure and maintain work area (See Safety Rules).
• With battery inserted, make sure switch turns saw on and off.
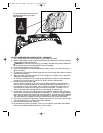
WARNING: To reduce the risk of injury
, It is important to support the work properly
and to hold the saw firmly to prevent loss of control which could cause personal
injury. Fig. G illustrates typical hand support.
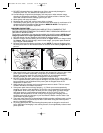
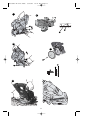
ATTACHING AND REMOVING THE BLADE - FIGURE L, L1
NOTE: The first time the blade bolt is removed from saw without a blade installed, it
may be necessary to place the blade wrench on the bolt head and tap it sharply in
the counter clockwise direction.
• Retract lower guard (11) and assemble blade (10) and clamp washer (21) as shown in
figure L.
• (BDCS2406 only) To prevent blade rotation keep the spindle lock button (28) depressed
and rotate the blade until the spindle lock engages (figure L).
• Tighten the blade clamping screw securely with the blade wrench.
• (All other models) To prevent blade rotation while tightening the blade clamping screw
(20), raise the lower guard and place the saw down on a piece of scrap wood as shown in
Fig. L1. The blade teeth will dig into the scrap wood and prevent rotation of the blade.
• Tighten the blade clamping screw securely with the blade wrench.
NOTE: The blade wrench is stored in the saw housing as shown in figure M.
Lower Blade Guard
WARNING: Laceration Hazard. The lower blade guard is a safety feature which
reduces the risk of serious personal injury. Never use the saw if the lower guard is
missing, damaged, misassembled or not working properly. Do not rely on the lower
blade guard to protect you under all circumstances. Your safety depends on
following all warnings and precautions as well as proper operation of the saw.
Check lower guard for proper closing before each use as outlined in Additional
Safety Rules for Circular Saws. If the lower blade guard is missing or not working
properly, have the saw serviced before using. To assure product safety and
reliability, repair, maintenance and adjustment should be performed by an
authorized service center or other qualified service organization, always using
identical replacement parts.
WARNING: To minimize the risk of eye injury, always use eye protection. Carbide is a
hard but brittle material. Foreign objects in the work piece such as wire or nails can cause
tips to crack or break. Only operate saw when proper saw blade guard is in place. Mount
blade securely in proper rotation before using, and always use a clean, sharp blade.
CAUTION: Do not cut ferrous metals (steel), masonry, glass or tile with this saw.
A dull blade will cause slow, inefficient cutting overload on the saw motor, excessive
splintering, and could increase the possibility of kickback.
90537965 BD Circ Saws 5/30/08 10:11 AM Page 13