


3
ENGLISH
7
ENGLISH
Warning! Always use the tool with the side
handle properly assembled.
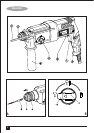
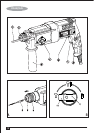
Fitting an accessory (fig.A)
• Clean and grease the shank (8) of the accessory.
• Pull back the sleeve (9) and insert the shank into the
tool holder (5).
• Push the accessory down and turn it slightly until it fits
into the slots.
• Pull on the accessory to check if it is properly locked.
The hammering function requires the accessory to be
able to move axially several centimetres when locked in
the tool holder.
• To remove the accessory, pull back the sleeve (9) and
pull out the accessory tool holder.
Use
Warning! Let the tool work at its own pace. Do not overload.
Warning! Before drilling into walls, floors or ceilings, check
for the location of wiring and pipes.
Selecting the operating mode (fig. B)
The tool can be used in three operating modes. Press in the
button (10) and rotate the drilling mode selector (4) towards
the required position, as indicated by the symbols.
Drilling
• For drilling in steel, wood and plastics, set the operating
mode selector (4) to the position.modes.
Hammer Drilling
• For hammer drilling in masonry and concrete, set the
operating mode selector (4) to the position
• When hammering, the tool should not bounce and run
smoothly. If necessary, increase the speed.
Hammering
• For hammering with spindle lock, and for light chiselling
and chipping, set the operating mode selector (4) to the
position.
• Make sure the forward/reverse switch is in the forward
position.
• When changing from hammer drilling to chiselling, turn
the chisel to the desired position. If resistance is felt
during mode change, slightly turn the chisel to engage
the spindle lock.
Selecting the direction of rotation
For drilling, and for chiselling, use forward (clockwise)
rotation. For removing a jammed drill bit, use reverse
(counterclockwise) rotation.
• To select forward rotation, push the forward/reverse
slider (3) to the left.
• To select reverse rotation, push the forward/reverse
slider to the right.
Warning! Never change the direction of rotation while the
motor is running.
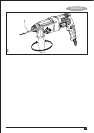
Setting the drilling depth (fig. C)
• Slacken the side handle (6) by turning the grip
counterclockwise.
• Set the depth stop (7) to the desired position. The
maximum drilling depth is equal to the distance between
the tip of the drill bit and the front end of the depth stop.
• Tighten the side handle by turning the grip clockwise.
Switching on and off
• To switch the tool on, press the variable speed switch
(1). The tool speed depends on how far you press the
switch.
• As a general rule, use low speeds for large diameter drill
bits and high speeds for smaller diameter drill bits.
• For continuous operation, press the lock-on button (2)
and release the variable speed switch. This option is
available only in forward (clockwise) rotation.