


10
OPERATION
SWITCH
• To operate the tool, depress the trigger
switch (1). The tool will continue to run
as long as the trigger is depressed.
• To turn the tool off, release the trigger
switch (1). There is no provision for
locking the tool on, and the switch
should never be locked on by any other
means.
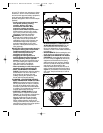
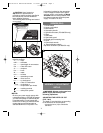
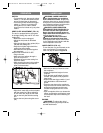
KERF PLATE ADJUSTMENT (FIG. 15)
The tool is equipped with a sight guide
for straight cutting (22) and for 45° miter
cutting (23).
• Be sure the saw is unplugged.
• Adjust the kerf plate as described
below.
• Align the left edge of the guides (22) or
(23) with the cutting line.
• Keep the kerf plate aligned with the
cutting line while sawing.
• Work with the shoe pressed against
the workpiece.
ADJUSTING THE KERF PLATE
• Plug in the saw.
• Make a test cut halfway through a
piece of scrap wood.
• Withdraw the saw so the cutting line
becomes visible.
• While keeping the saw in this position,
unplug the saw and loosen the kerf
plate on the saw shoe.
• Align the 0° mark (22) on the kerf plate
with the cutting line. When adjusting
for 45° miter cuts, align the 45° mark
(23) on the kerf plate with the cutting
line.
• Secure the kerf plate using the screw
(24).
LASER LINE
WARNING: LASER RADIATION.
Never aim the beam at a workpiece
with a reflective surface. Bright shiny
reflective sheet steel or similar reflective
surfaces are not recommended for laser
use. Reflective surfaces could direct the
beam back toward the operator.
DANGER: LASER RADIATION.
AVOID DIRECT EYE EXPOSURE. Do
not stare into the laser light source.
Never aim light at another person or
object other than the workpiece. Laser
light can damage your eyes.
WARNING: DO NOT use tinted
glasses to enhance the laser light.
Tinted glasses will reduce overall vision
for the application and interfere with the
normal operation of the tool.
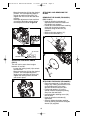
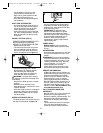
LASER SWITCH (FIG. 16)
To turn the laser on, push forward on the
laser on/off switch (2) to activate the
laser line (25) as shown in figure 16.
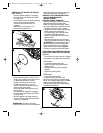
TO USE THE LASER LINE
• Mark the line that you intend to cut on
the workpiece.
• Adjust the depth and angle of cut as
required.
• Push the laser on/off switch (2) to the
forward “ON” position and project the
laser beam.
• Depress the saw trigger switch (1) and
allow the blade to reach maximum
speed.
• Place the saw shoe on the workpiece.
Align the laser line with the mark on the
workpiece and slowly push the saw
forward keeping the laser line on the
mark.
• Upon completion of the cut, release the
trigger and allow the saw blade to come
to a complete stop before switching off
the laser.
SAWING
WARNING: To reduce the risk of
serious personal injury,always hold the
tool with both hands.
15
16
24
23
22
2
25
642742-00 01 FS1300 FS1500CSL 11/29/07 2:18 PM Page 10