


11
10
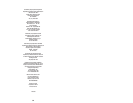
5) DRILLING: Make sure the material to be drilled is tightly fastened and when drilling thin materials use a wood
support. Always drill at a 90º angle and place enough pressure on the drill for the drill to perforate the surface
you are drilling. Never use excessive force when using your drill.
6) ACCESSORIES: Various accessories can fit your drill, allowing you to diversify its use.
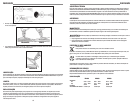
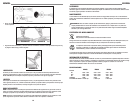
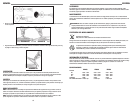
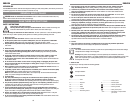
7) SANDING / POLISHING: Position the disc as shown in the figure below. Place the rubber support in the chuck
and turn the chuck key clockwise to tighten the jaws to securely fasten the disc. To set the polishing feature
follow the example using the rubber disc and the spindle.
• When sanding, do not put all the pressure on the face of the disc; incline the disc at an angle on the surface.
FEATURES
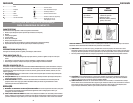
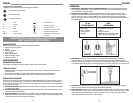
This tool includes some or all of the following features.
1. Drill switch (only with specific models)
2. Chuck
3. On/off switch or variable switch
4. Lock-on button
5. Air ventilation
6. Variable Speed and Reverse switch
7. Side handle
USE
ON/OFF SWITCH
To switch your drill on, depress the on/off switch; your drill stops when the switch is released.
LOCK-ON BUTTON
• If continuous operation is required, press the lock-on button while the on/off switch is depressed.
• To stop when operation is continuos, depress the on/off switch again and release.
PERCUSSION SWITCH
This is a special feature in your drill that allows hitting and rotating at the same time.
a) DRILL MODE When drilling wood and metal. Useful for drilling projects only.
b) HAMMER MODE When drilling masonry, set the hammer switch in this mode.
c) VARIABLE SPEED Press the variable speed switch. The tool speed depends on how far you press the switch. As a
general rule, use low speeds for large diameter drill bits and high speeds for smaller diameter drill bits.
OPERATIONS
1) AS A GENERAL RULE. For large size drill bits use low speeds and for smaller drill bits use high speeds. On
variable speed drills, the more the trigger is pressed the faster the speed.
2) SET THE SPEED OF YOUR DRILL. Set the forward/reverse switch to the desired direction of rotation. Never
change the setting of the hammer switch, or the forward/reverse when your drill is in operation.
3) MAINTAIN VENTS CLEAR OF OBSTRUCTION. In order to maintain your tool from over heating and extend the life
of your tool, maintain the ventilation areas of your tool free from obstruction all the time.
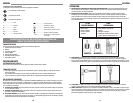
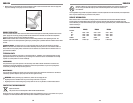
4) HOW TO POSITION A DRILL BIT ON YOUR DRILL. Select the appropriate drill bit for the job (follow the guidelines
of the table below). First, make sure the drill is unplugged. Holding the rear section of the chuck, rotate the front
section until the jaws of the chuck are sufficiently open. Insert the drill bit in the jaws of the chuck. Hold the rear
section of the chuck while tightening the front. Turn the chuck key clockwise to tighten the jaws and securely
grip the drill bit. Use the chuck key in the 3 holes for better results.
ADDITIONAL SAFETY INSTRUCTIONS
FOR HAMMER DRILLS
DRILL BIT APPLICATION
• High Speed Steel
• Cabide Steel
• Tungesten Carbide
• Steel, Aluminium, all types of woods
• All types of wood
• Masonry, concrete, stone, brick, tile
marble, etc.
ENGLISH
ENGLISH
WRONG
RIGHT
WRONG
RIGHT