


8
WARNING:
Never attempt to open the battery pack for any reason. If battery pack
case is cracked or damaged, do not insert into charger. Do not crush, drop or damage
battery pack. Do not use a battery pack or charger that has received a sharp blow,
been dropped, run over or damaged in any way (i.e., pierced with a nail, hit with a
hammer, stepped on). Damaged battery packs should be returned to service center for
recycling.
WARNING: Fire hazard. Do not store or carry battery so that metal objects can
contact exposed battery terminals.
For example, do not place battery in aprons,
pockets, tool boxes, product kit boxes, drawers, etc., with loose nails, screws, keys, etc.
Transporting batteries can possibly cause fires if the battery terminals
inadvertently come in contact with conductive materials such as keys, coins,
hand tools and the like.
The US Department of Transportation Hazardous Material
Regulations (HMR) actually prohibit transporting batteries in commerce or on airplanes
(i.e., packed in suitcases and carry-on luggage) UNLESS they are properly protected
from short circuits. So when transporting individual batteries, make sure that the battery
terminals are protected and well insulated from materials that could contact them and
cause a short circuit.
STORAGE RECOMMENDATIONS
1. Always store batteries charged.
2. The best storage place is one that is cool and dry away from direct sunlight and
excess heat or cold.
3. Recharge discharged batteries as soon as possible after use or battery life
may be greatly diminished.
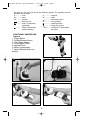
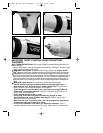
CHARGING PROCEDURE
1. Plug the charger into an appropriate outlet before inserting the battery pack.
2. Insert the battery pack into the charger (figure B). Be sure the pack is fully
seated in the charger. While charging, the red (charging) LED will flash continuously
(slowly) indicating that the charging process has started.
3. The completion of charge is indicated by the red LED becoming solid. (approximately
5-6 hours) The pack is fully charged and may be used at this time or left on the
charger.
4. Recharge discharged batteries as soon as possible after use or battery life
may be greatly diminished.
CHARGE INDICATORS
Replace Pack:
These chargers are designed to detect certain problems that can arise with battery packs
which would be indicated by the red light flashing at a fast rate. If this occurs, re-insert
battery pack. If problem persists, try a different battery pack to determine if the charger is
OK. If the new pack charges correctly, then the original pack is defective and should be
returned to a service center for recycling. If the new battery pack gives the same trouble
indication as the original, have charger tested at an authorized service center.
Note: It may take as long as fifteen minutes for the charger to determine that the pack is
defective.
If the battery pack is too hot or too cold, the LED will alternately blink fast and slow, one
flash at each speed and repeat.
DAISY CHAIN (FIGURE C)
Single and dual port chargers can be electrically connected in any order up to a
maximum of 4 chargers. Each charger has a power-in cord (which plugs into the
electrical outlet) and a power-out cord (which plugs into the next charger).
To connect chargers in a daisy chain:
1. Plug the power-in cord into an electrical outlet.
2. Remove the power-in cord from the next charger and plug in the power-out cord
from the charger that is now plugged into the outlet.
3. Repeat this process for the remaining chargers.
Chargers that are daisy chained together operate independently as though each one
90520993 VPX1201 VPX Dril#E4FEB 7/11/07 9:48 AM Page 8