


7
X Charge discharged batteries within 1 week. Battery life
will be greatly diminished if stored in a discharged state.
Charge indicators
If the charger detects a problem with a battery pack, the
charge indicator (11) will flash at a fast rate.
X If this occurs, re-insert the battery pack (9).
X If the problem persists, put a different battery pack in the
charger to determine if the charger is OK.
X If the new battery pack charges correctly, then the
original battery pack is defective and should be returned
to a service centre for recycling.
X If the new battery pack gives the same indication as the
original, take the charger to be tested at an authorized
service centre.
Note: It may take as long as fifteen minutes to determine that
the pack is defective.
If the battery pack is too hot or too cold, the LED will
alternately blink fast and slow, one flash at each speed and
repeat.
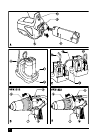
Battery chargers - daisy chaining (fig. C)
Single and dual port chargers can be electrically connected
in any order up to a maximum of 4 chargers. Each charger
has a power-in cord (12) which plugs into the electrical outlet
and a power-out cord (13) which plugs into the next charger.
To connect the chargers in a daisy chain:
X Plug the power-in cord (12) into an electrical outlet.
X Remove the power-in cord from the next charger and
plug in the power-out cord (13) rom the charger that is
now plugged into the outlet.
X Repeat this process for the remaining chargers.
Chargers that are daisy chained together operate
independently as though each one was plugged into a
separate outlet, therefore a battery can be removed from
anywhere along the daisy chain without affecting the other
chargers.
Use
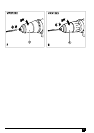
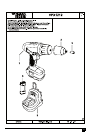
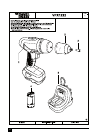
Switching on and off (fig. D and E)
X To switch the tool on, press the variable speed trigger
switch (7).
X To switch the tool off, release the variable speed trigger
switch (7).
X A forward/reverse control button (4) determines the
direction of the tool and also serves as a lock off button.
X To select forward rotation, release the variable speed
trigger switch (7) and move the forward/reverse control
button (4) to the left, looking forward.
X To select reverse direction, move the forward/reverse
control button (4) in the opposite direction.
X The centre position of the control button (4) locks the
tool in the off position. Make sure that the variable speed
trigger switch (7) is released before changing the
position of the forward/reverse control button (4).
X If the tool does not turn on, check to see if one of the two
VPX
TM
battery packs is depleted. See the section
‘Battery LED indicators’ below.
Battery LED indicators
This product is equipped with electronics which will shut-off
the power when either battery pack is depleted. If the tool
stops suddenly, one of battery packs may be depleted. An
LED (14) on the back of the tool handle will indicate which
battery pack is depleted.
In order to illuminate the indicator (14) squeeze the variable
speed trigger switch (7). To insure optimal runtime, remove
both battery packs and place in a charger. Two battery
indicators are located on the back of the tool above the
batteries. If battery power is depleted while using your
appliance, you can determine which battery needs to be
recharged.
To check battery status:
X Squeeze the trigger and observe which LED is
illuminated.
X Remove the battery pack corresponding to the LED
which is illuminated.
Torque control (fig. D and E)
Your tool is fitted with a 24 position collar (2 or 8) to select
the operating mode and to set the torque for tightening
screws. Large screws and hard workpiece materials require
a higher torque setting than small screws and soft workpiece
materials.
X For drilling in wood, metal and plastics, set the collar to
the drilling position symbol.
X For screwdriving, set the collar to the desired setting. If
you do not know the appropriate setting, proceed as
follows:
X Set the collar to the lowest torque setting.
X Tighten the first screw.
X If the clutch ratchets before the desired result is
achieved, increase the collar setting and continue
tightening the screw. Repeat until you reach the correct
setting. Use this setting for the remaining screws.
Hammer action (VPX1222 only)
Your drill has hammer action:
X For drilling in masonry, set the torque control collar to
the position.
High/low speed selector (fig. D and E)
The 2-speed feature of your drill allows for greater versatility.