


-7-
Operating Instructions
VARIABLE SPEED CONTROLLED
TRIGGER SWITCH
Your tool is equipped with a variable speed
trigger switch. The tool speed can be
controlled from the minimum to the maximum
nameplate RPM by the pressure you apply to
the trigger. Apply more pressure to increase
the speed and release pressure to decrease
speed. This accurate speed control enables
you to drill without center punching. It also
permits you to use as a power screwdriver.
Accessories are available for driving screws
as well as running bolts and nuts.
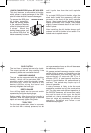
INSTALLING SDS-plus
®
ACCESSORIES
Clean the insert shank end of the accessory to
remove any debris, then lightly grease with a
light oil or lubricant
Insert accessory into the bit holder through the
dust shield, while twisting and pushing inward
until it locks automatically into place. Pull
outward on the accessory to be certain it is
locked into the bit holder (Fig. 2).
NOTE: The high efficiency available from the
rotary hammers can only be obtained if sharp
and undamaged accessories are used. The
"cost" to maintain sharp and undamaged
accessories is more than offset by the "time
saved" in operating the tool with sharp
accessories.
REMOVING SDS-plus
®
ACCESSORIES
Accessories may be hot after
use. Avoid contact with skin
and use proper protective gloves or cloth to
remove.
To remove an accessory, pull and hold locking
sleeve backward and pull bit forward. All
accessories should be wiped clean after
removing.
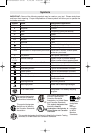
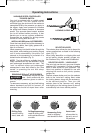
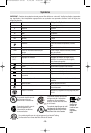
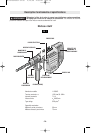
SELECTOR LEVER
The selector lever allows the tool to be set for
various applications as listed in the following
chart, (Fig. 3).
When using demolition or chipping bits such
as bull points, chisels, spades, gouges, etc.
the “Hammer Only” mode must be selected.
SELECTOR LEVER - “VARIO-LOCK”
The vario-lock can be set in any one of twelve
positions (30˚ increments). Choose a position
which is best suited for your operation. The
Vario-Lock position is intended for use with
chipping bits such as bull points, spades,
gouges, etc.
Depress release button and turn the selector
lever to the “vario-lock” setting. Next, rotate
the locking sleeve, along with the accessory,
to the desired position. Then turn the
selector lever to the “hammer only” setting
and slightly turn the locking sleeve to have it
automatically lock into a definite position.
!
WARNING
Drilling/Hammering:
used for drilling with
solid carbide bits and
core bits
Hammering Only:
used for chipping
and demolition work
Vario-Lock:
allows chisel to
be set in one of
36 positions
Drilling Only
used for drilling
wood, steel, etc.
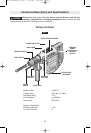
LOCKING SLEEVE
FIG. 2
FIG. 3
BM 1619929532 02-08 2/15/08 4:00 PM Page 7