


TRIGGER "ON-OFF" SWITCH
To turn the tool “ON” squeeze and hold the
trigger switch. To turn the tool “OFF”,
release the trigger switch, which is spring
loaded and will return to the “OFF” position
automatically.
Your tool is also equipped with a "Lock-ON"
feature which allows continuous operation
without holding the trigger.
TO LOCK TOOL “ON”:squeeze the trigger
switch until it locks.
TO TURN TOOL: “OFF“ press the trigger
release switch and the trigger will return to
the “OFF” position automatically.
To increase switch life, do not turn switch on
and off while tool is under load.
AUTO-MAX ™
The patented Bosch Auto-Max system
insures that each time your tool is plugged in
and receiving power, it will operate at
maximum speed and impact force.
When the power cord is
unplugged from the mains
outlet or when branch-circuit power is
interrupted, the electronic controller will
automatically reset the tool to maximum
speed and impact force.
Unexpected starting
at maximum operating speed and impact force
could startle the operator and lead to potential
injury.
VARIABLE SPEED DIAL
Your tool is equipped with a variable speed
dial. The speed and impact force can be
adjusted by rotating the dial. Higher speeds
and impact force work best for faster
penetration when chiseling in hard masonry
material. Slower speeds work best for
chiseling material such as plaster or tile.
CONSTANT RESPONSE CIRCUITRY
The internal electronic feedback system
provides a "soft start", which will reduce the
stresses that occur from a high torque start.
The system also helps to keep the pre-
selected impact rate and rotating speed
virtually constant between no-load and load
conditions.
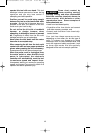
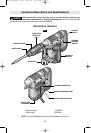
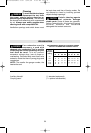
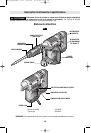
INSTALLING ACCESSORIES
Clean the insert shank end of the accessory
to remove any debris, then lightly grease with
a light oil or lubricant.
Insert accessory into the tool holder through
the dust shield, while twisting and pushing
inward until it locks automatically into place.
Pull outward on the accessory to be certain it
is locked into the tool holder.(fig. 2).
NOTE: The high efficiency available from the
rotary hammers can only be obtained if sharp
and undamaged accessories are used. The
"cost" to maintain sharp and undamaged
accessories is more than offset by the "time
saved" in operating the tool with sharp
accessories.
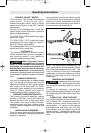
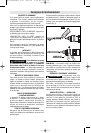
REMOVING ACCESSORIES
Accessories may be hot after
use. Avoid contact with skin
and use proper protective gloves or cloth to
remove.
To remove an accessory, pull and hold
locking sleeve backward and pull bit forward.
All accessories should be wiped clean after
removing.
"VARIO-LOCK"- SELECTOR RING
The vario-lock selector ring can be set in any
one of twelve (30˚ increments) positions.
Choose a position which is best suited for
your operation. To adjust, pull the selector
ring forward and hold firmly, then turn both
the accessory and the selector ring to the
desired position. Release the selector ring
and turn the accessory slightly until it locks in
place.
-7-
Operating Instructions
!
WARNING
!
WARNING
LOCKING SLEEVE
FIG. 2
BM 1619929H13 9-04 9/22/04 2:19 PM Page 7