


Disconnect battery pack
from tool or place the
switch in the locked or off position before
making any assembly, adjustments or
changing accessories. Such preventive
safety measures reduce the risk of starting
the tool accidentally.
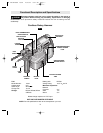
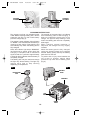
Clean the insert shank end of the accessory
to remove any debris, then lightly grease
with a light oil or lubricant.
Insert accessory into the tool holder through
the dust shield, while twisting and pushing
inward until it locks automatically into place.
Pull outward on the accessory to be certain
it is locked into the tool holder (Fig. 2).
NOTE: The high efficiency available from
the rotary hammers can only be obtained if
sharp and undamaged accessories are
used. The “cost” to maintain sharp and
undamaged accessories is more than offset
by the “time saved” in operating the tool
with sharp accessories.
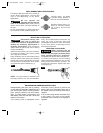
REMOVING ACCESSORIES
When removing the bit
from the tool avoid contact
with skin and use proper protective gloves
when grasping the bit or accessory.
Accessories may be hot after prolonged use.
To remove an accessory, pull the locking
sleeve backwards (towards the rear of tool),
while pulling the accessory outward. All
accessories should be wiped clean after
removing (Fig. 3).
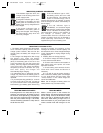
The selector dial allows the tool to be set for
various drilling applications. Shift the dial
right or left depending on the below
applications.
Do not operate the
selection dial until the tool
come to a complete stop. Shifting during
rotation of the chuck can cause damage to
the tool.
Do not use demolition or chipping bits such
as bull points, chisels, spades, gouges, etc.
Drill only action: For drilling
in woods, metals, plastics or
other non concrete materials.
Drill with hammer action: For
drilling in concrete, asphalt,
tile or other similar hard
materials.
-9-
INSTALLING ACCESSORIES
!
CAUTION
DRILL/HAMMER DRILL SELECTION DIAL
!
WARNING
!
WARNING
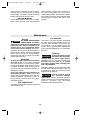
Release battery pack from tool by pressing
on both sides of the battery release tabs and
pull downwards. Before inserting battery
pack, remove protective cap from battery
pack. To insert battery, align battery and
slide battery pack into tool until it locks into
position. Do not force.
Your battery pack is equipped with a
secondary locking latchs to prevent the
battery pack from completely falling out of
the handle, should it become loose due to
vibration.
If any of the locking latches are broken (Fig.
4 & 5). Return your tool to the nearest
Authorized Service Center to be repaired or
replaced
RELEASING AND INSERTING BATTERY PACK
FIG. 2
FIG. 3
BM 1619929562 10/03 10/2/03 3:01 PM Page 9