


Service
Preventive maintenance
performed by unauth-
orized per so n nel may result in misplacing
of internal wires and components which
could cause serious hazard. We
recommend that all tool service be performed
by a Bosch Factory Service Center or Autho -
rized Bosch Service Station.
TOOL LUBRICATION
Your Bosch tool has been properly lubricated
and is ready to use. It is recommended that
tools with gears be regreased with a special
gear lubricant at every brush change.
CARBON BRUSHES
The brushes and commutator in your tool
have been engineered for many hours of
dependable service. To maintain peak
efficiency of the motor, we recommend every
two to six months the brush es be examined.
Only genuine Bosch replace ment brushes
specially designed for your tool should be
used.
BEARINGS
After about 300-400 hours of operation, or at
every second brush change, the bearings
should be replaced at Bosch Factory Service
Center or Au thorized Bosch Service Station.
Bearings which become noisy (due to heavy
load or very abrasive material cut ting) should
be replaced at once to avoid overheating or
motor failure.
Cleaning
To avoid accidents always
dis connect the tool from
the power supply before cleaning or
performing any main tenance. The tool may
be cleaned most effectively with compressed
dry air. Always wear safety gog gles when
cleaning tools with compressed air.
Ventilation openings and switch levers must
be kept clean and free of foreign matter. Do
not at tempt to clean by inserting pointed
objects through openings.
Certain cleaning agents
and sol vents damage
plastic parts. Some of these are: gasoline,
carbon tetrachlo ride, chlo rinated cleaning
solvents, ammonia and house hold
detergents that contain ammonia.
!
WARNING
!
WARNING
Maintenance
!
CAUTION
I
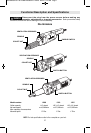
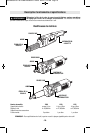
NSTALLING ACCESSORIES
(Model 1210 only)
1. Insert the locking pin provided into hole in
the spindle, to prevent the spindle from
rotating.
2. Hold locking pin in place and rotate collet
nut counter-clockwise with the (14mm) wrench
that is provided.
3
. Insert three fourths of shank of accessory
into the collet, and securely tighten with the
wrench provided.
REMOVING ACCESSORIES
Repeat steps 1 and 2 of above and remove
accessory.
-9-
BM 2609932751 09-09:BM 2609932751 09-09 9/3/09 7:20 AM Page 9