


6
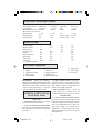
Extension Cords
• Replace damaged cords immediately. Use of
damaged cords can shock, burn or electrocute.
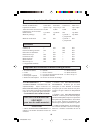
• If an extension cord is necessary, a cord with
adequate size conductors should be used to
prevent excessive voltage drop, loss of power
or overheating. The table below shows the
correct size to use, depending on cord length
and amperage rating on the tool’s nameplate.
If in doubt, use the next heavier gauge. Always
use U.L. and CSA listed extension cords.
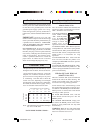
Ampere Rating (shown on nameplate)
0- 2.1- 3.5- 5.1- 7.1- 12.1-
2.0 3.4 5.0 7.0 12.0 16.0
25' 18 18 18 18 16 14
50' 18 18 16 16 14 12
75' 18 18 16 14 12 10
100' 18 16 14 12 10
150' 16 14 12 12 Wire Gauge
Note: The smaller the gauge number, the larger
the wire is in the cord.
"SAVE THESE INSTRUCTIONS"
Cord Length
Double Insulated Tools
• Double Insulation is a design concept used in
electric power tools which eliminates the need
for the three wire grounded power cord and
grounded power supply system. It is a recog-
nized and approved system by Underwriter’s
Laboratories, CSA and Federal OSHA authori-
ties.
IMPORTANT: Servicing of a tool with
double insulation requires care and knowledge
of the system and should be performed only by
a qualified service technician. WHEN SER-
VICE IS REQUIRED USE ONLY IDENTI-
CAL REPLACEMENT PARTS.
POLARIZED PLUGS: If your tool is equipped
with a polarized plug (one blade is wider than
the other), this plug will fit in a polarized outlet
only one way. If the plug does not fit fully in the
outlet, reverse the plug. If it still does not fit,
contact a qualified electrician to install the
proper outlet. To reduce the risk of electric
shock do not change the plug in any way.
0
1
10
4
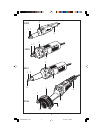
Operating the Tool
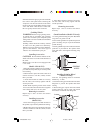
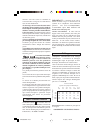
"Tri-Control" Paddle Switch
Models 1209 & 1214
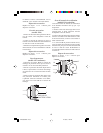
The "Tri-Control" Paddle Switch enables the
operator to control switch functions of "Lock-
OFF", "ON/OFF" and "Lock-ON".
TO UNLOCK SWITCH
AND TURN TOOL
"ON": Push the paddle
lever 4 FORWARD
toward the spindle just
enough to allow the
paddle lever to be
squeezed and activiate the switch.
TO SWITCH TOOL "OFF": Release pressure
on the paddle lever. The switch is spring loaded
and will return to "OFF" position automatically.
The"Lock-ON" feature, incorporated into the
paddle switch, is a convenience for long
operations.
TO LOCK SWITCH "ON": After switch has
been activated, PUSH the paddle lever
completely FORWARD and release pressure
on the paddle lever.
TO UNLOCK AND SWITCH TOOL "OFF":
Squeeze and then release the paddle lever. The
switch is spring loaded and will return to "OFF"
position automatically.
Slide On-Off Switch With Lock
(Models 1210 & 1215)
The tool is switched “ON” by the switch button
located at the side of the motor housing. The
switch can be locked in the “ON” position, a
convenience for long grinding operations.
To turn the tool “ON” without locking it, slide
the switch button 5 forward by applying pres-
sure ONLY at the REAR portion of the button.
When pressure is released the switch button
will snap to “OFF” position.
TO LOCK THE SWITCH “ON”, slide the
switch button forward and press “IN” the
FRONT portion.
TO UNLOCK THE SWITCH, simply press
and release the REAR portion of the button.
Switch is spring loaded and will snap back
automatically.
WARNING! Hold the tool with both hands
while starting the tool, since torque from the
motor can cause the tool to twist.
BM 3609929341 12/03 12/16/03, 11:40 AM6