


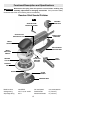
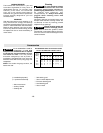

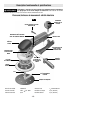


BACKING PAD INSTALLATION
The random orbit sander is equipped with a
backing pad of soft hardness, which is
suitable for general service. Harder and softer
pads are available for other purposes, and in
general are used as follows;
Extra soft pad - Polishing or sanding large or
curved surfaces.
Soft pad - All purpose general sanding and
polishing.
Hard pad - Heavy sanding on flat surfaces,
especially with coarser abrasives.
To change backing pad, hold pad firmly and
turn screw counterclockwise with 5mm allen
wrench provided. Remove old pad, and place
new pad over locating pins on drive spindle.
Replace screw and securely tighten in a
clockwise direction with the allen wrench.
Damaged or worn backing pads must be
replaced immediately (Fig. 1).
INSTALLING ACCESSORIES
The random orbit sander uses hook-and-loop
backed accessories, which firmly grip the pad
when applied with moderate pressure. To
change the accessory, merely peel off the old
accessory, remove dust from the pad if
necessary, and press the new accessory in
place. Be sure to align the sanding disc holes
with the holes in the backing pad to allow the
dust extraction system to function.
After considerable service the pad surface will
become worn, and the pad must be replaced
when it no longer offers a firm grip. If you are
experiencing premature wearout of the pad
facing, decrease the amount of pressure you
are applying during operation of the tool.
DUST EXTRACTION
Your sander is equipped with a removable
vacuum hose adapter tube for dust and chip
extraction. The vacuum hose adapter tube
serves as the connector to the (optional)
vacuum hose.
To use this feature, attach vacuum hose
adapter tube to footplate with the screw
provided (Fig. 1).
For vacuuming, a Bosch Air Sweep vacuum
hose (optional accessory) can be directly
connected to the vacuum hose adapter tube.
SIDE HANDLE
The side handle used to guide and balance
the tool can be threaded into the front housing
on either side of the tool, depending on
personal preference and comfort. Use the side
handle for safe control and ease of operation.
-7-
Assembly
Operating Instructions
SLIDE ON-OFF SWITCH WITH LOCK
The tool is switched “ON” by the switch
button located at the side of the motor
housing. The switch can be locked in the
“ON” position, a convenience for long
sanding and polishing operations.
TO TURN THE TOOL “ON” without locking
it, slide the switch button forward by
applying pressure ONLY at the REAR portion
of the button. When pressure is released the
switch button will snap to “OFF” position.
TO LOCK THE SWITCH “ON”, slide the
switch button forward and press “IN” the
FRONT portion.
TO UNLOCK THE SWITCH, simply press
and release the REAR portion of the button.
Switch is spring loaded and will snap back
automatically.
Hold the tool with both
hands while starting the tool,
since torque from the motor can cause the
tool to twist.
Start the tool before applying to work and let
the tool come to full speed before contacting
the workpiece. Lift the tool from the work
before releasing the switch. DO NOT turn the
switch “ON” and “OFF” while the tool is
under load; this will greatly decrease the
switch life.
!
WARNING