


Operating Instructions
-7-
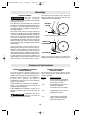
BELT INSTALLATION
To prevent personal injury,
always disconnect the plug
from the power source before removing or
installing the belt.
Your belt sander will accept non woven or
polishing belts up to 8mm (5/16") thick, but
it is necessary to adjust the dust port flap to
allow clearance for the thicker belt.
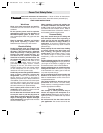
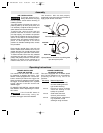
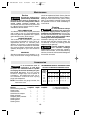
To adjust flap, remove screw and pull
position knob free of the tool. Lower dust
port flap slightly, and reinsert the position
knob with the locating tab facing forward as
shown to hold flap in the lowered position.
Reinsert screw and tighten position knob in
place. To raise flap back to its normal
position for standard sanding belts, reverse
this procedure.
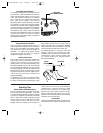
Place sander upside down, and pull belt
tension release lever towards rear of tool to
release the belt. Pull the old belt free of the
pulleys through the open side of the sander.
To install new belt, leave lever fully released
and place the new belt in position over the
pulleys and platen protector. If the belt has a
direction of rotation arrow marked on its
inside surface, be sure to face the belt in
that direction. With the belt properly
positioned, push lever back into its recess to
apply proper tension to the belt.
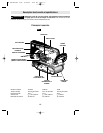
TRIGGER SWITCH AND
“LOCK-ON” BUTTON
Your sander can be turned “ON” or “OFF”
by squeezing or releasing the trigger. Your
sander is also equipped with a “Lock-ON”
button located just above the trigger that
allows continuous operation without holding
the trigger TO LOCK SWITCH ON: squeeze
trigger, depress “Lock-ON” button and
release trigger.
TO UNLOCK THE SWITCH: squeeze trigger
and release it without depressing the “Lock-
ON” button.
If the “Lock-ON” button is
continuously being de-
pressed, the trigger cannot be released.
VARIABLE SPEED DIAL
(1275DVS & 1276DVS)
This tool is equipped with a variable speed
dial. The belt speed may be controlled by
presetting the dial in any one of six
positions.
Dial setting
Material/Application
3 thru 5 Delicate surfaces, veneers,
and with sanding frame for
light surface finishing.
3 thru 5 Plastics or other surfaces
where belt loading or heat
buildup is a problem
4 thru 6 Solid wood, fast stock
removal, paint removal
3 thru 6 General service, metal sand-
ing, chipboard, coarse
sandingon rough surfaces
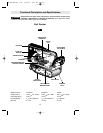
Assembly
!
WARNING
LOCATING
TAB
Open position for non-woven or polishing belts
up to 8mm (5/16") thick.
PORT FLAP
POSITION
KNOB
Normal position for standard belts
SCREW
!
WARNING
BM 2610967913 9/03 9/26/03 4:56 PM Page 7