


SLIDE "ON/OFF" SWITCH
Your tool can be switched "ON" by the slide
switch located on top of the motor housing.
TO TURN TOOL "ON" slide the switch
forward.
TO TURN TOOL "OFF" slide the switch
backward.
VARIABLE SPEED DIAL
This tool is equipped with a variable speed
dial. The belt speed may be adjusted during
sanding operation by presetting the dial on
or between any one of the six numbers.
However the optimum belt speed and grit of
the sanding belt depends on the material
and can be determined by a practical test.
Note: the speeds listed below are only
"approximate" or "suggested" settings.
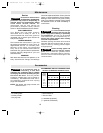
Application Grit Speeds
Coarse Fine
Roughing paint 180 240 1-2
Removing paint, enamel 60 120 5-6
Softwood 60 240 5-6
Hardwood 60 180 5-6
Particle board 60 180 5-6
Rust removal 60 80 5-6
Non-ferrous metal 80 180 4-5
Plastic 80 240 2-3
Acrylic 80 240 1-2
DUST EXTRACTION
Your tool is equipped with a dust port for
dust extraction. To use this feature, attach
vacuum hose (optional accessory) to the
dust port, and connect the opposite end of
the hose to a shop vacuum cleaner.
AUXILIARY HANDLE
The auxiliary handle will provide additional
control, support and guidance for the tool.
To mount, thread handle into hole provided
in housing.
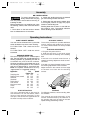
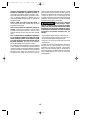
TRACKING ADJUSTMENT
1. Plug tool into power source.
2. Hold the tool firmly in one hand, switch
tool on and note the tracking of the sanding
belt.
If the belt runs outward toward arrow 1,
rotate the tracking adjustment knob counter-
clockwise
If the belt runs inward toward arrow 2, rotate
the tracking adjustment knob clockwise.
Adjust the belt in this manner until the edge
of the belt runs flush with the backing
surface.
SANDING
For different materials, various sanding belts
are available.
The removal rate and the quality of the
surface are determined by the selection of
the sanding belt (grit) as well as the belt
speed setting (see Settings Table).
-7-
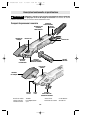
Operating Instructions
To prevent personal injury,
always disconnect the plug
from the power source before removing or
installing the belt.
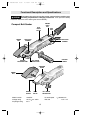
Before installing the new sanding belt, clean
the backing surface, idler roller and tension
roller.
1. Push down on the belt tension release
lever to release tension on the rollers.
2. Install new sanding belt with the desired
grit over backing surface and rollers.
3. Swing back the belt tension release lever
to its original position to apply the proper
tension to the sanding belt.
Sanding belts that are worn on one side can
be turned by 180º. The special adhesive
allows sanding in both directions.
!
WARNING
Assembly
1
2
BELT INSTALLATION
BM 2609931631 9/00 2/14/01 4:42 PM Page 7