


Always disconnect the plug
from the power source before
attaching or removing abrasive sheets.
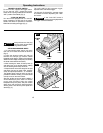
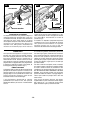
ATTACHING ABRASIVE SHEET
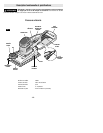
1. To open sanding sheet clamp, pull clamp
lever out of its recess and lower as shown in
(Fig. 2).
2. Place the abrasive sheet (grit side up)
between the clamper grip and the rubber
baseplate while aligning edges of the abrasive
sheet with either edge of the pad. (Pre-bending
the sheet makes attachment easier.)
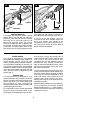
3. After inserting the sheet, lift clamp lever up
and return lever to its original position making
sure the sanding sheet clamp is secure.
4. Wrap the sheet around the length of the pad
and attach free end of sheet under opposite
clamp and repeat procedures 1, 2, & 3 above.
The abrasive sheet must be drawn as tight as
possible for efficient sanding, as a loose sheet
can slip or tear on the work surface.
After the sanding sheet has been installed, it
will be necessary to punch holes in it with the
punch plate provided. Align the rubber
baseplate with punch plate, and push sander
down firmly until the punch plate pierces the
sanding sheet. Then remove punch plate from
sander (Fig. 3).
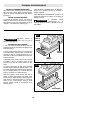
TRIGGER “ON-OFF” SWITCH
To turn tool “ON,” squeeze the trigger switch.
To turn the tool “OFF,” release the trigger
switch which is spring loaded and will return to
“OFF” position automatically (Fig 1).
“LOCK-ON” BUTTON
Your tool is also equipped with a “Lock-ON”
button located on the left side of the trigger
handle, that allows for operation at maximum
RPM without holding the trigger (Fig. 1).
TO LOCK SWITCH ON: squeeze trigger,
depress button and release trigger.
TO UNLOCK THE SWITCH: squeeze trigger
and release it without depressing the “Lock-
ON” button.
If the “Lock-ON” button is
continuously being depressed,
the trigger cannot be released.
-6-
Operating Instructions
!
WARNING
!
WARNING
PUNCH PLATE
CLAMP
LEVER
SANDING
SHEET
CLAMPER
GRIP
FIG. 3
FIG. 2