


-8-
5*7&9.3,3897:(9.438
88*2'1>
!
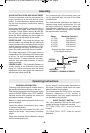
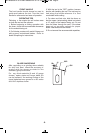
Correct clearances must be maintained for
proper functioning of the tool and for clean
cutting. To avoid accidents, always disconnect
the tool from the power source while making
adjustments
Insert lower shear blade in groove provided in
the footplate and upper shear blade in groove
of plunger. Finger tighten screws () and ().
Do not omit lock washer and flat washer for
screw (). When adjusting the lower blade, be
sure plunger is at the bottom of the stroke.
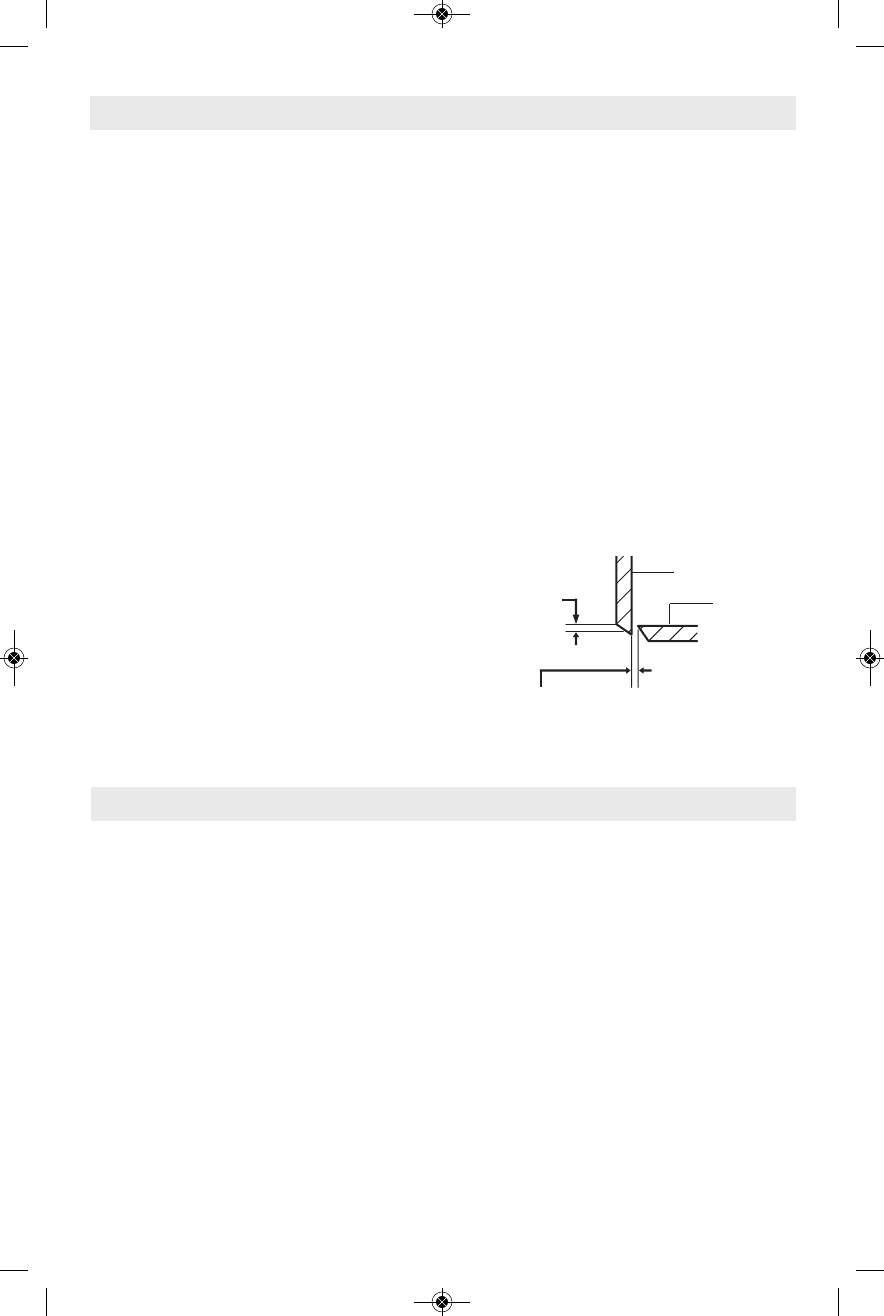
! – First bring the plunger into
the top position by moving the fan blade with
the pin provided. Move the upper blade until the
vertical clearance between the blades is 1/64".
After tightening the upper blade screw (),
tighten the setting screw with the pin provided.
The height adjustment of the upper blade is
independent of the thickness of the sheet metal
to be cut. For soft and malleable materials it
must, however, in some cases be set lower,
while for hard and brittle materials, it may be
slightly increased.
# – The horizontal clearance is
directly related to the thickness of the metal
being cut. Adjust clearance with the blade
adjustment screw, then tighten the lower blade
with the lower blade screw ().
The clearance gap of the material being cut
can be obtained with the help of the table
provided below.
The recommended clearances are based on
standard sheet metal specifications. For soft
and tough materials (i.e. aluminum), reduce the
recommended clearance. For hard and brittle
materials (i.e. special stainless steel), increase
the recommended clearance.
&:,* &=.2:21*&7&3(*
8 (.164") .032 (0.8mm)
10 (.134") .024 (0.6mm)
12 (.104") .020 (0.5mm)
14 (.074") .016 (0.4mm)
16 (.059") .012 (0.3mm)
General rule: Max. clearance =
0.2 x material thickness.
Following a few simple tips will reduce wear on
the tool and the chance of injury to the user.
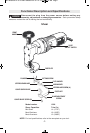
With the tool unplugged from the power supply
and the ON/OFF Switch in the “OFF” position,
become familiar with handling the shear and
learning the location of its parts.
Secure or clamp small workpieces to be cut to
prevent slippage.
Inspect the blades for excessive wear, rotate
or replace if necessary.
Always direct the cord toward the rear, and
away from the shear. Keep it away from sharp
edges.
Never start the shear with the blades in contact
with the material being cut.
Do not exceed recommended capacities for
this shear. Premature blade failure will occur
when the shear is over-gaged.
To extend blade life and prevent corrosion,
frequent lubrication of the blades is
recommended. Any light weight machine oil
can be used for this purpose.
#
The Tool is switched "ON" by the slide switch
located at the side of the motor housing.
TO TURN TOOL "ON": slide the switch
forward.
TO TURN TOOL "OFF": slide the switch
backward.
VERTICAL
CLEARANCE
HORIZONTAL
CLEARANCE = MAXIMUM CLEARANCE
UPPER BLADE
LOWER
BLADE
BM 1609929Y01 05-10:BM 1609929Y01 05-10 5/10/10 9:10 AM Page 8