


!##"#
"!
The lithium ion battery is protected against
deep discharging by the “Electronic Cell
Protection (ECP)”. When the battery is empty,
the cordless grinder is switched off by means
of a protective circuit.
Do not continue to press the
On/Off switch after the tool
has been automatically switched off. The
battery can be damaged.
85- =1. =885 @2=1 +8=1
1*7-<@125.<=*;=270=1.
=885<27,.=8;:>./;86=1.68=8;,*7
,*><.=1.=885=8=@2<=
""&#&#
The tool is switched “ON” by the switch button
located at the side of the motor housing. The
switch can be locked in the “ON” position, a
convenience for long grinding operations.
TO TURN THE TOOL “ON” without locking it,
slide the switch button forward by applying
pressure ONLY at the REAR portion of the
button. When pressure is released the switch
button will snap to “OFF” position.
TO LOCK THE SWITCH “ON”, slide the switch
button forward and press “IN” the FRONT
portion.
TO UNLOCK THE SWITCH, simply press and
release the REAR portion of the button.
Switch is spring loaded and will snap back
automatically.
## "
Always hold the tool away from your face.
Accessories can be damaged during handling,
and can fly apart as they come up to speed.
This is not common, but it does happen.
Start the tool before applying to work and let
the tool come to full speed before contacting
the workpiece. Lift the tool from the work
before releasing the switch. DO NOT turn the
switch “ON” and “OFF” while the tool is under
load; this will greatly decrease the switch life.
9.;*=2707<=;>,=287<
-10-
<<.6+5B
2<,877.,=+*==.;B9*,4
/;86=885+./8;.6*4270*7B
*<<.6+5B *-3><=6.7=< 8; ,1*70270
*,,.<<8;2.<. Such preventive safety measures
reduce the risk of starting the tool accidentally.
"#!""!"
./8;.><270*0;27-270@1..5
9827=8;,87.+.,.;=*27
=1*=2=<6*A26>6<*/.89.;*=270<9..-2<
78=.A,..-.-+B=1.7*6.95*=.<9..-8/
=1.0;27-.; Do not exceed the recom mended
wheel point or cone diameter of 2 inches.
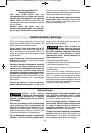
"#""!"
.<>;.=1*==1.-2*6.=.;8/
=1.<1*742<=1.<*6.<2C.
*<=1.27<2-.-2*6.=.;8/=1.,855.=
To prevent damage to collet,
avoid excessive tightening of
the collet nut when there is no accessory inserted.
Only use properly fitting and undamaged
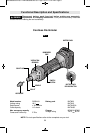
open-end 19 mm wrenches.
1. Place a (19 mm) open-end wrench onto the
spindle to prevent the spindle from rotating
(Fig. 2).
2. Hold wrench in place and rotate collet nut
counter-clockwise with another (19 mm)
open-end wrench.
3. Insert three fourths of shank of accessory
into the collet and securely tighten collet nut
clockwise.
!%""!"
Repeat steps 1 and 2 of above and remove
accessory.
!
WARNING
!
WARNING
!
WARNING
!
WARNING
!
CAUTION
!
CAUTION
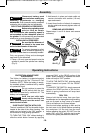
B
SPINDLE LOCK
WRENCH
19 MM
COLLET NUT
WRENCH
19 MM
SHANK OF
ACCESSORY
COLLET
FIG. 2
BM 3609929C20 08-11:BM 3609929C20 08-11.qxp 8/31/11 8:47 AM Page 10