


Disconnect the plug from
the power source before
making any assembly, adjustments or
changing accessories. Such preventive
safety measures reduce the risk of starting the
tool accidentally.
To prevent personal injury.
Only operate tool with the
wrap around handle.
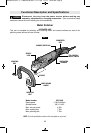
WRAP AROUND HANDLE
The wrap around handle used to guide and
balance the tool and should be securely attach
to the front housing with the two mounting bolts
as shown. Use the wrap around handle for
ease of operation (Fig. 1).
MOUNTING ACCESSORIES
Clean the spindle and all parts to be mounted.
For tightening and loosening the accessories,
lock the spindle with the spindle lock button
(Fig. 1).
Actuate the spindle lock button only when the
spindle is at a complete standstill. Otherwise,
the tool may become damaged.
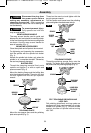
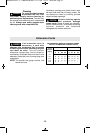
BUFFING DISC
Thread the clamping mandrel firmly onto
spindle and tighten it a with an open-end
spanner wrench (Fig. 2)
Mount the backing flange and the buffing disc
onto the clamping mandrel. Thread on the lock
nut and tighten with the two pin spanner
wrench.
POLISHING PLATE
Mount the two spacer discs and the polishing
plate onto spindle (Fig. 3).
Thread on the round nut and tighten with the
two-pin spanner wrench.
Pull the lamb’s wool bonnet over the polishing
plate and tighten the attachment strings.
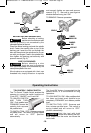
POLISHING SPONGE
Thread the polishing sponge firmly onto the
spindle. The lambs skin polishing bonnet can
be pulled over the polishing sponge (Fig. 4).
FELT POLISHING DISC/HOOK AND
LOOP PAD
Felt polishing discs/hook and loop pads are
equipped with their own threaded hub, simply
thread on to spindle (Fig. 5). Be sure to seat
against shoulder of spindle before turning
tool “ON”.
-9-
Assembly
!
WARNING
!
WARNING
SPACER
DISCS
FIG. 3
POLISHING
PLATE
ROUND
NUT
LAMBS
WOOL
BONNET
SPINDLE
SPINDLE
POLISHING
SPONGE
LAMBS SKIN
POLISHING
BONNET
FIG. 4
SPINDLE
CLAMPING
MANDRIL
BACKING
FLANGE
BUFFING
DISC
LOCK NUT
FIG. 2
BM 2610019017 11-11:BM 2610019017 11-11.qxp 11/1/11 10:34 AM Page 9