


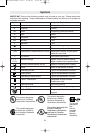

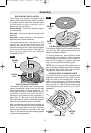

BACKING PAD DAMPER
Your tool is equipped with an integrated
backing pad damper ring. This damper
reduces the no-load speed, which helps
prevent swirl marks on the workpiece surface
and provides uniform finishing.
NOTE: If you notice steadily increasing no-
load speed, this indicates that the damper ring
is worn and needs to be replaced.
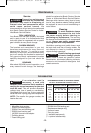
To replace damper ring, remove backing pad
as described in “Backing Pad Installation” and
remove worn damper ring by pulling firmly out
of locating groove. Loosen the two screws on
shroud just enough so you can separate
shroud approximately 1/4 inch. Align locating
bumps on damper ring with cut outs in shroud
and depress ring with thumbs until shroud
seats into groove completely around ring, then
tighten screws (Fig. 5).
IMPORTANT: Ring should not have bends or
ripples when correctly seated.
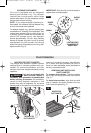
MICROFILTER DUST CANISTER
The integral dust extraction system collects
sanding dust in canister supplied with your
sander. For maximum efficiency, the dust
canister should be emptied frequently during
operation.
Your tool is equipped with
a dust canister, empty it
frequently, after completion of sanding and
before storing the sander.
Be extremely
careful of dust disposal, materials in fine
particle form may be explosive. Do not throw
sanding dust on an open fire. Combustion from
mixture of varnishes, lacquers, polyurethane,
oil or water with dust particles can occur if
there is a static discharge, spark introduced in
the box, or excessive heat.
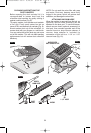
REMOVING AND INSTALLING
DUST CANISTER
To remove dust canister:
Twist the canister
left or right and simply pull away from the tool
(Fig. 6).
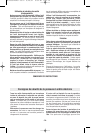
To install dust canister: align dust port with
hole in canister and push canister onto tool
until it locks into place (Fig. 7).
Dust Collection
!
WARNING
FIG. 6
FIG. 7
MICROFILTER
DUST CANISTER
DUST PORT
MICROFILTER
DUST CANISTER
-8-
2
1
DAMPER
RING
SHROUD
BACKING
PAD
LOCATING BUMPS
ON UNDERSIDE OF
DAMPER RING
FIG. 5
BM 2609140467 08-07 8/28/07 8:54 AM Page 8