


Page 2
MODEL 744SFL
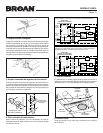
PLAN THE INSTALLATION
The unit can be installed anywhere between ceiling joists using
mounting brackets provided. Install in a flat ceiling only.
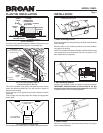
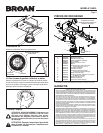
Typical Installation
Two of the most common ways to
connect ductwork to the unit.
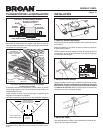
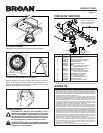
INSTALLATION
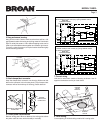
2. Mark mounting location.
Position unit between joists and extend mounting brackets.
IMPORTANT: Position brackets so there will be an 1/8” gap
between bottom of housing and ceiling material. Mark the top
of keyhole slot on all four mounting brackets.
The unit must not be installed above or inside the cooking area shown.
Do not install in a cooking area.
1/8" GAP
1. Install mounting brackets.
Slide the adjustable mounting brackets into the bracket channels
on the housing.
Bend the tabs on the cardboard protector and insert protector
into opening in housing.
NOTE: The cardboard protector shields the inside of the housing
from drywall spray and construction dust. Do not remove it until
after construction is completed.
CARDBOARD PROTECTOR
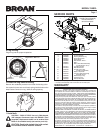
3. Pound in nails.
Remove unit temporarily, and pound nails partially into joists at
all four marked locations.
Cooking
Equipment
Floor
COOKING AREA
Do not install above or
inside this area.
45
o
45
o
NOT FOR USE IN
A COOKING AREA.
The unit will operate most quietly and efficiently when located
where the shortest possible duct run and minimum number of
elbows will be needed.
Use a roof cap or wall cap that has a built-in damper to reduce
backdrafts.
Plan to supply the unit with proper line voltage and appropriate
power cable.
ROOF
CAP
*
4-IN. ROUND
ELBOW(S)
*
4-IN.
ROUND
DUCT
*
WALL
CAP
*
*
Purchase
separately
INSULATION
(Can be placed around and
over fan housing.)
FAN
HOUSING
HOUSING
MOUNTING
BRACKET
CEILING
JOIST
POWER
CABLE
TRIM RING / BAFFLE
FINISHED CEILING
4" ROUND
DAMPER/DUCT
CONNECTOR &
4” ROUND
DUCTWORK