SolarFlat 2W/12V
Battery “Maintainer”
SolarFlat 5W/12V
Battery “Trickle Charger”
SolarFlat 15W/12V
Battery “Charger”
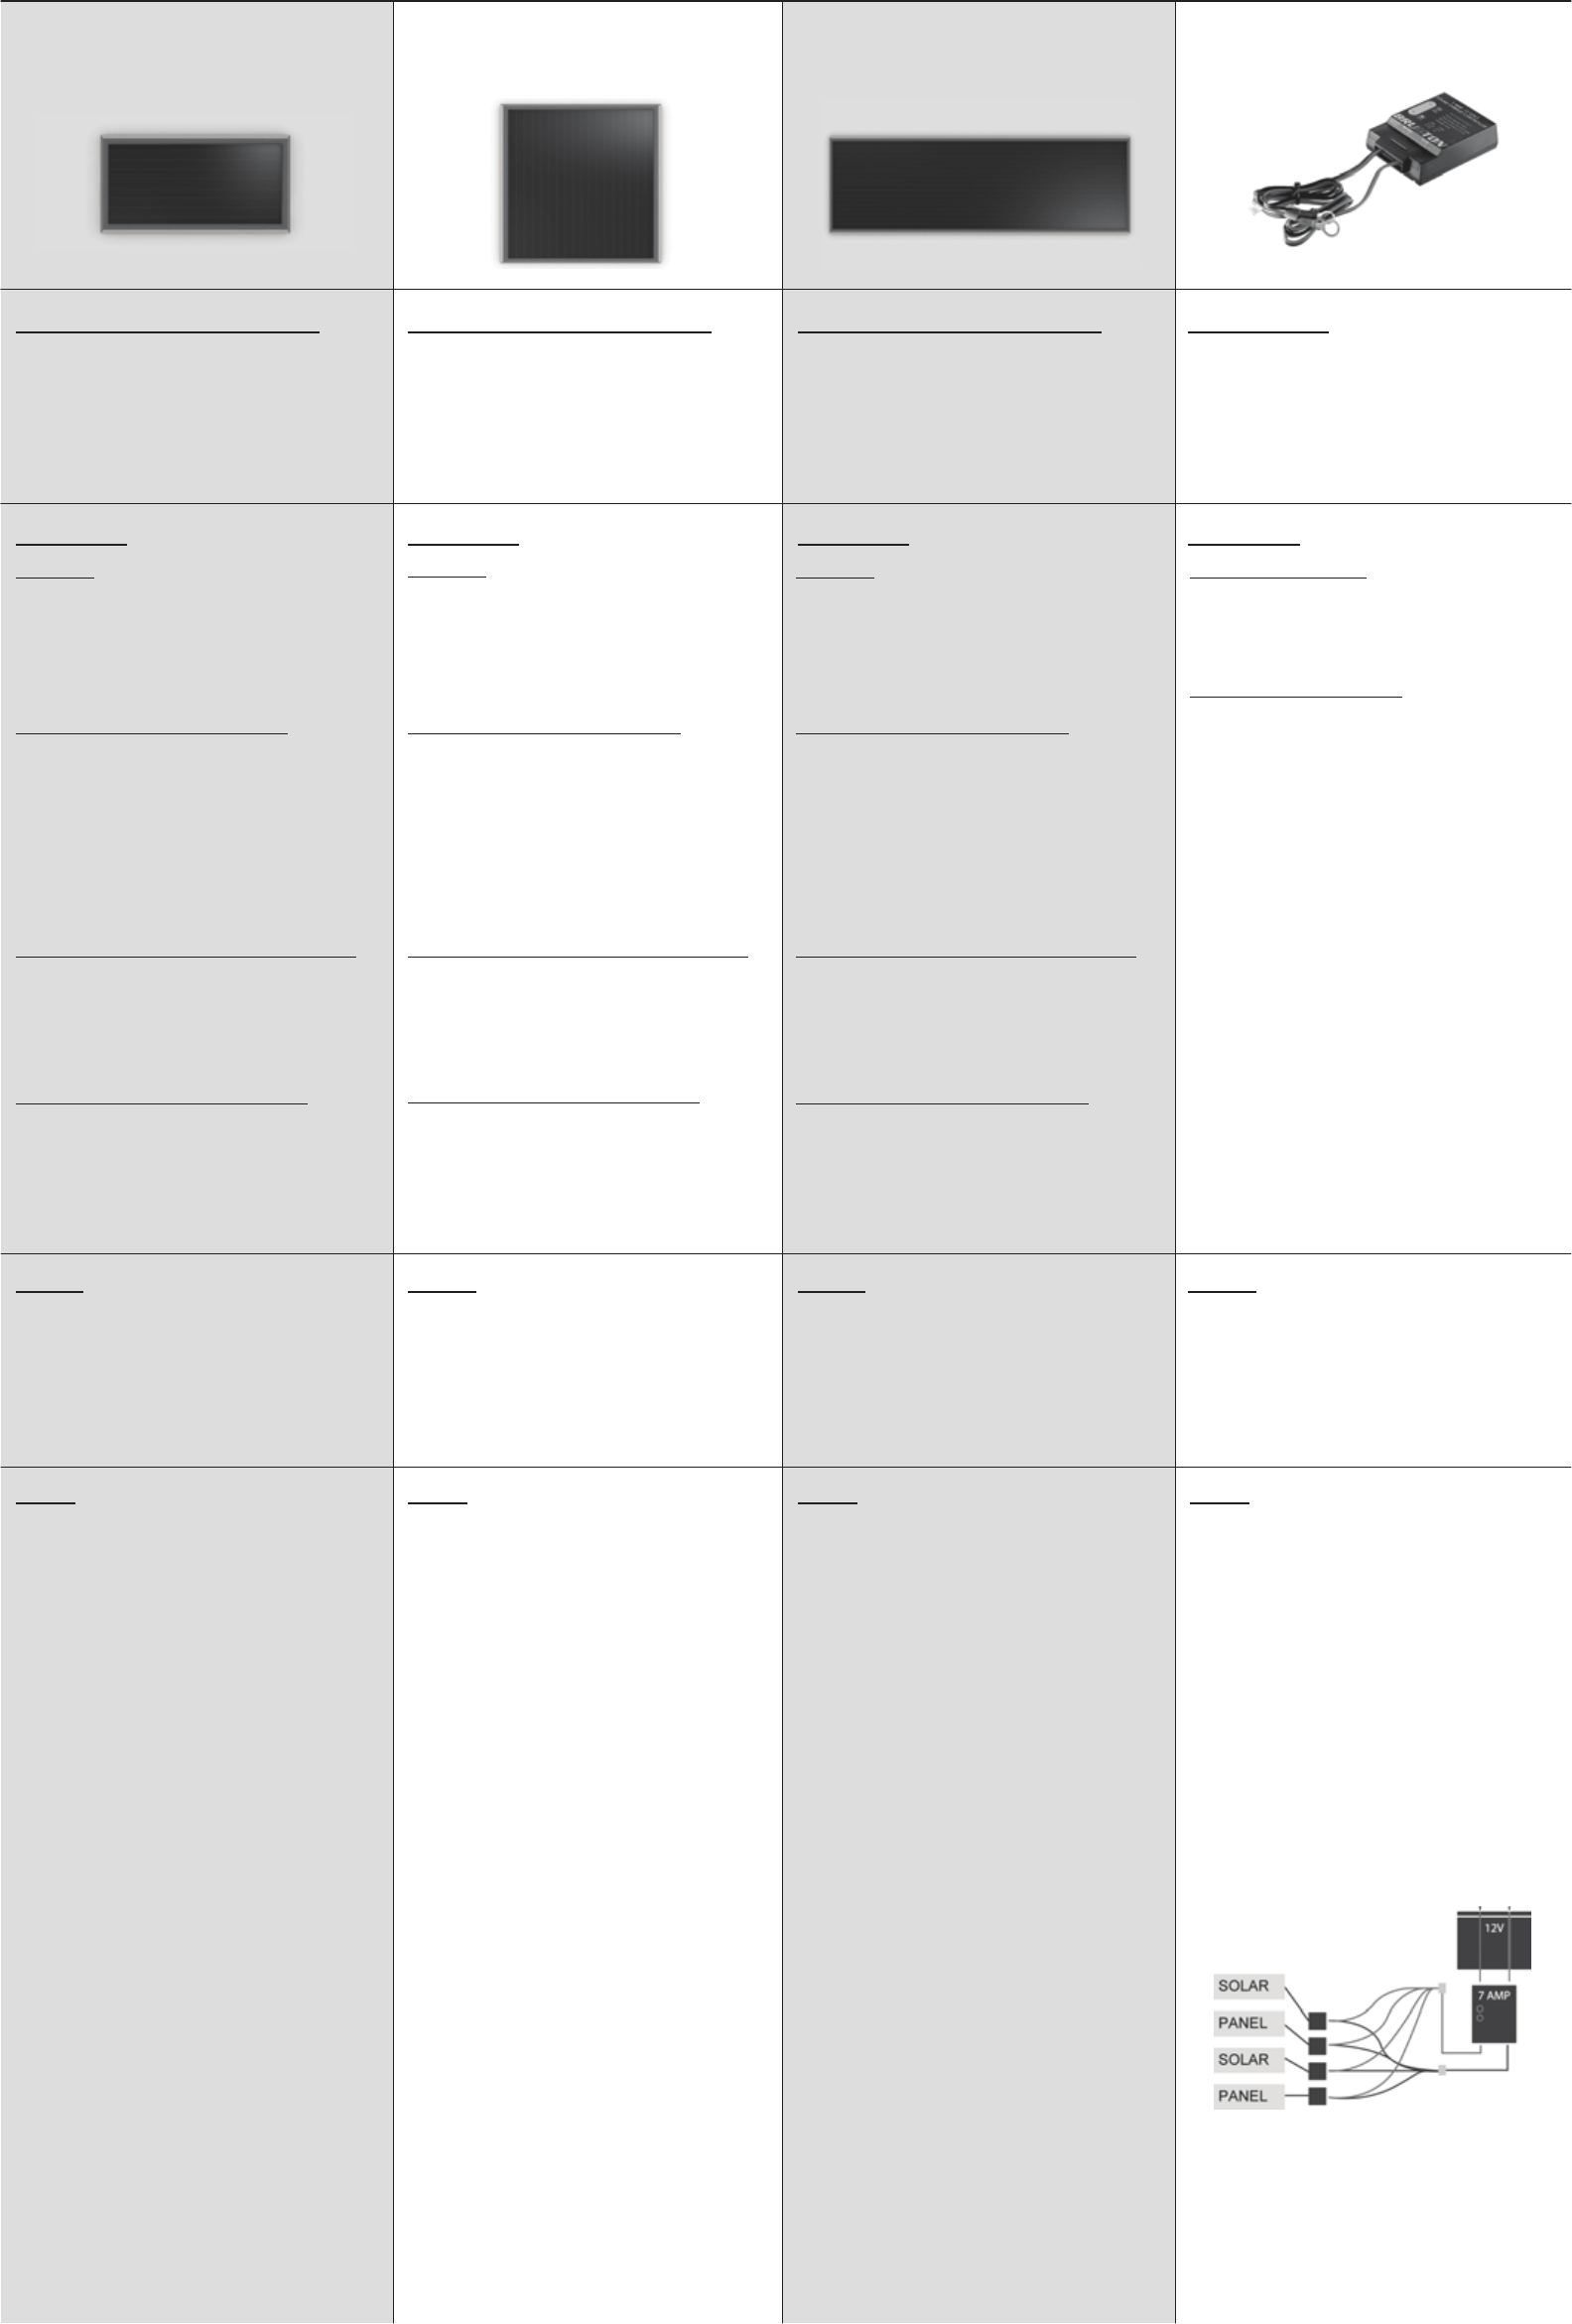
Solar Charge Controller
Specifications & Included Items: Specifications & Included Items: Specifications & Included Items: Specifications:
Power Rating: Up to 2 Watts
Max Current: 120 mAmps @ 17.7 Volts
Includes: Solar Panel, 12ft wire, Battery
Clamp, Female Vehicle
Adaptor, Bare Wire Inter-
connector and LED test light
Power Rating: Up to 5 Watts
Max Current: 300 mAmps @ 17.7 Volts
Includes: Solar Panel, 12ft wire, Battery
Clamp, Female Vehicle
Adaptor, Bare Wire Inter-
connector and LED test light
Power Rating: Up to 15 Watts
Max Current: 900 mAmps @ 17.7 Volts
Includes: Solar Panel, 12ft wire, Battery
Clamp, Female Vehicle
Adaptor, Bare Wire Inter-
connector and LED test light
Cut-in Volta
ge: 13 Volts
Cut-out Voltage: 14.2 Volts
Max. Load: 105 watts / 7 amps
Installation: Installation: Installation: Installation:
Connecting Using Battery Clamps:
1. Connect the Battery Clamp connector to the
SolarFlat extension cord.
2. Connect the battery clamps correctly by
matching the red clamp, which is Positive (+), to
the Positive (+) terminal on your battery.
3. Connect the black clamp, which is Negative (-),
to the Negative (-) terminal on your battery.
*Follow this carefully to not cause any bodily harm.
Connecting Using Female Vehicle Adaptor:
1. Connect the Female Vehicle Adaptor connector
to the SolarFlat extension cord.
2. Connect Female Vehicle Adaptor to male cigar
plug, and use to power hand-held electronic
devices, such as cell-phones and cameras.
Connecting Using Bare Wire Adaptor
1. Connect the Bare Wire connector to the
SolarFlat extension chord.
2. Securely connect bare wire cables to adjoining
positive and negative cables.
*Note that negative bare wire cable is the cable
without writing on black sheath of wire.
Mounting:
For optimal performance, choose a high sunlight
area and place securely with solar panel side
facing directly towards the sun.
*Note: Do not screw holes directly through front of
frame. This will cause damage to solar product.
Connecting to Battery:
Connect the Solar Charger Controller (SCC)
battery side (right) to the positive (+) battery
terminal and the negative (-) wire to the negative (-)
battery terminal.
Notes: Notes: Notes: Notes:
• SolarFlat LED Test Light can be connected to
extension cord to indicate that solar panel is
functioning properly.
• SolarFlat includes blocking diode to prevent
reverse current.
• SolarFlat LED Test Light can be connected to
extension cord to indicate that solar panel is
functioning properly.
• SolarFlat includes blocking diode to prevent
reverse current.
• SolarFlat includes blocking diode to prevent
reverse current.
• It is strongly recommended to use a 7 Amp Solar
Charge Controller to prevent battery overcharge.
This unit is sold separately.
• Solar Controller should be placed within 5ft of
the battery, and in a dry, well-ventilated area.
• Supports up to 105 Watts of power. Not
advisable to use with greater wattage.
• All connections should be parallel to ensure 12V
– positive to positive and negative to negative.
FAQs:FAQs: FAQs: FAQs:
Connecting to Solar Panel:
Using the bare wire adaptor from the SolarFlat
extension cord, connect the positive (wire without
writing) to positive and negative to negative of
SCC. Ensure wire connectors are secure.
1. Can I use the panel outdoors?
A.Yes, this panel has been weatherproofed.
2. What type of batteries can my SolarFlat 2 charge?
A.All 12V batteries like ones used in cars,
boats, RV’s, motorcycles and PWC’s.
3. Can I overcharge my battery?
A.The SolarFlat 2 has a built in blocking diode
that prevents battery discharge and
overcharging.
4. Will the SolarFlat 2 keep my battery fu
lly charged?
A.The Maintainer charges your battery with the
power of the sun. It compensates for key
offdrain and long periods of non-use and on
board electronics. It is designed to maintain
batteries.
5. How long does it take to charge a dead battery?
A.The unit is designed to maintain batteries
only. If the battery is dead, we recommend a
larger output solar charger such as the 5W or
15W Brunton SolarFlats.
6. Can I extend the wire?
A.The 12’ wire can be extended up to 25’
without loss of power of voltage damage.
1. Can I use th
e panel outdoors?
A.Yes, this panel has been weatherproofed,
including UV protection and for weather
effects of -35° F to 175 ° F.
2. Will panel drain battery at night?
A.No, this panel includes a battery diode to
prevent battery drain and reverse current.
3. What type of batteries can my SolarFlat 5 charge?
A.Any deep cycle 12V battery.
4. How long will it take to charge a battery?
A.Under ideal conditions, this panel will
generate up to 300 mAmps of current. A 5W
panel is not designed to charge batteries, but
only trickle charge batteries thereby insuring
quick starts.
5.
Can I run appliances off this panel?
A.Yes, however, the current will vary depending
on the sunlight. Charging a battery is
therefore the recommended installation and
running protocol
6. Do I need a Solar Controller?
A.No, a charge controller is only recommended
for panels greater than 15W.
7. How far can I extend the wire?
A.Current length should accommodate 95% of
installations, however, wires can be extended
up to a maximum of 30ft. with 16 gauge wire.
1. What type of batteries can my SolarFlat 5 charge?
A.All 12V batteries like ones used in cars,
boats, RV’s, motorcycles and PWC’
s.
2. Can I overcharge my battery?
A.Yes! It is recommended to use our 7 Amp
Solar Controller to not overcharge the battery
3. Will the SolarFlat15 keep my battery fully
charged?
A.Yes, using the power of the sun, the
SolarFlat 15 will keep a battery charged.
4. How long does it take to charge a dead battery?
A.Under ideal conditions, this panel will
generate up to 900 mAmps of current. A 40
Amp Hr. battery at 50% would take 20 Hrs.
By doubling the amount of panels, you would
reduce the time by half.
5. Can I extend the wire?
A.The 12ft wires can be ext
ended up to a
maximum of 30ft. with 16 gauge wire.
6. How many batteries can I using 1 unit?
A.The SolarFlat 15 is capable of charging a
bank of batteries, but the charge will be
divided.
7. Can this solar charger run my house?
A.No, the panel is best used to charge 12V
batteries
8. Is the my solar charger weatherproof?
A.Yes, this panel is fully weatherproof.
1. How many panels can I connect to my Solar
Controller Charger?
A.You can connect up to 105 watts of solar
power. Panels should be connected in
parallel – positive to positive a
nd negative
to negative.
2. When will the Charging Indication light (green)
light up?
A.The charging controller indication green
light will light up when the battery voltage
reaches 14.2 Volts and the SCC will prevent
the solar panels from overcharging the
battery. It is normal for the SCC LED to
light on and off as the battery voltage cuts in
and out.
SolarFlat 15W/12V
Brunton Solar Panel Instructions


